> ## Documentation Index
> Fetch the complete documentation index at: https://docs.ownid.com/llms.txt
> Use this file to discover all available pages before exploring further.
# Login
> Learn how to add the OwnID widget to your login page
Login is the first frontend integration you should build after completing backend event handlers.
In addition to the login integration procedure, this page includes instructions for installing and referencing the SDK, which is a prerequisite for all other frontend integrations.
## Prerequisites
To get the most out of this guide, make sure you've already completed the backend integrations as described in [Build Server-Side Endpoints](/building-blocks/build-server-endpoints).
## Integrating Login
Integrate login in just three steps.
1. Step 1 - Install OwnID Web SDK
2. Step 2 - Reference the OwnID SDK
3. Step 3 - Add the Widget to your Login Form
Figure 1. After implementation (example)
### Step 1 - Install OwnID Web SDK
The OwnID Web SDK provides communication between your frontend login page and the OwnID cloud server.
If you're using React or Angular frameworks, and you haven't yet installed the OwnID SDK on your local system, you should do that now before continuing.
To install the React-based or the Angular-based SDK, select the tab that matches your framework and copy the npm command shown.
```javascript React theme={null}
npm install @ownid/react
```
```javascript Angular theme={null}
npm install @ownid/angular
```
### Step 2 - Reference the OwnID SDK
Reference the SDK at the top of your web pages.
```javascript JavaScript theme={null}
```
```jsx React theme={null}
import { OwnIDInit } from '@ownid/react';
//place this component on the top level of the component hierarchy
//this component doesn't render to any visible UI
ReactDOM.render(
,
document.getElementById("root"),
);
```
```javascript Angular theme={null}
import { OwnidAngularModule } from '@ownid/angular';
@NgModule({
imports: [
OwnidAngularModule.forRoot({appId:'s9d8f7s98f79s87dfMyAppID'}),
]})
```
**Recommendations**
* Include the SDK on all pages, even those without user-facing authentication elements. Doing so will enable users to access additional functionality, wherever they are on your site.
* If you are using OwnID UAT environment, change the src to `https://cdn.uat.ownid.com/sdk/`
### Step 3 - Add the Widget to your Login Form
The SDK **login** method is used to integrate the login journey. It references the field Ids in your existing login form. It also renders the OwnId widget by automatically referencing your field elements (through their id) to calculate its position in the DOM.
The sample login forms in the snippets below are vanilla examples, shown here only to confirm the implementation pattern of form fields in SDK methods.
#### Calling the SDK
In JavaScript, OwnId SDK methods are instantiated by calling `ownid` with the appropriate method name and its parameters:
```Javascript theme={null}
ownid("method_name", {
parameter_1: value_1,
parameter_2: value_2,
...
parameter_n: value_n,
// Handle errors as you see fit
onError: (error) => console.log(error),
// When the relevant event fires,
onSomeEvent: (event) => console.log(event)
});
```
We'll use the **login** method name here.
Check the Angular or React implementation example snippets for framework-specific variations of the syntax above.
#### Implement **login** Method
In the ownid method:
1. Enter "login" for the method name.
2. Assign the form field (as a DOM element) you use as the password to the `passwordField` parameter.
3. Assign the form field (as a DOM element) you use as the login id to the `loginIdField` parameter.
4. Assign an error function as desired in the `onError` parameter.
5. Configure the `onLogin` event to copy the `data.token` object locally. The `data.token` is the value generated by the `getSessionByLoginId` endpoint and you should use it to set a user session or exchange it for a session token.
**Session identifier can be ANY data Object**
Although we're calling it a 'token', the session identifier can be any unique data object. We only pass it right back to you so you're able to associate a callback with a session.
Use the code snippets below, and check the embedded comments, to model your implementation of the submit handler and the SDK **login** method.
```javascript Javascript theme={null}
```
```jsx React theme={null}
import { OwnID, WidgetType } from '@ownid/react';
...
function LoginComponent() {
const emailField = useRef(null);
const passwordField = useRef(null);
function onLogin(data) {
//Generic example on how to set a session and redirect the user (use your own!)
//1. set user session using data.token (usually a jwt or session token), generated in your backend and sent through the OwnID server
localStorage.setItem('sessionID', JSON.stringify({ token: data.token }));
//2. redirect the user (this is just an example)
window.location.href = '/account';
}
return (
);
}
```
```javascript Angular theme={null}
onLogin(data) {
//Generic example on how to set a session and redirect the user (use your own!)
//1. set user session using data.token (usually a jwt or session token), generated in your backend and sent through the OwnID server
this.authService.setAuth({ token: data.token });
//2. redirect the user (this is just an example)
this.router.navigateByUrl('/account');
}
```
**That's it!**
You've implemented the frontend functionality required for the user to login.
If you're ready to deploy your integration, make sure to read the [Pre-Deployment Checklist](/building-blocks/pre-deployment-checklist) before hand!
## Styling Options
The OwnID login widget can be styled in different ways to match your application's design:
### Default Button (Side-by-side)
Default button variant (Example for michaelkors.com)
The default implementation places the OwnID button side by side with the password field. This is the standard configuration and requires no additional parameters.
If you would like to style this button, you can do it in the OwnID Console or utilize the following CSS variables:
```css theme={null}
ownid-fingerprint-button-widget {
--ownid-button-widget-border-radius;
--ownid-button-widget-font-size;
--ownid-button-widget-color;
--ownid-button-widget-border-color;
--ownid-button-widget-check-size;
--ownid-button-widget-check-position-top;
--ownid-button-widget-check-position-right;
z-index;
}
```
### Standalone Button
Standalone button variant (Example for nfl.com)
For cases where you want to position the OwnID button independently from the password field, use the standalone button variant:
```javascript theme={null}
ownid('login', {
variant: 'standalone-button',
infoTooltip: false,
loginIdField: document.querySelector('#email'),
element: document.getElementById('button-wrapper-div'),
// other configuration options...
});
```
In the code sample above, `button-wrapper-div` represents the div where the button will be shown. Configure your own.
If you would like to style this button, you can utilize the following CSS variables:
```css theme={null}
ownid-standalone-button-widget {
height: 40px;
--ownid-button-width: 100%;
width: 100%;
--ownid-button-widget-border-color;
--ownid-button-widget-border-radius;
--ownid-button-widget-font-size;
--ownid-button-widget-font-weight;
--ownid-button-widget-color;
--ownid-button-widget-icon-height;
--ownid-button-widget-icon-stroke-width;
--ownid-button-widget-check-size;
--ownid-button-widget-check-position-top;
--ownid-button-widget-check-position-right;
}
```
### Custom Button
For complete control over the button's appearance, you can create your own custom button or HTML element. To implement this:
1. Create your custom button element:
```html theme={null}
```
2. Trigger the OwnID login flow by calling the `ownid.auth` function:
```javascript theme={null}
const email = document.getElementById('email').value;
ownid('auth', email);
```
This approach gives you full control over the button's styling while maintaining OwnID's functionality.
## Next Steps
### Ready to deploy?
Take me to the Deployment Checklist
I want to build another user journey
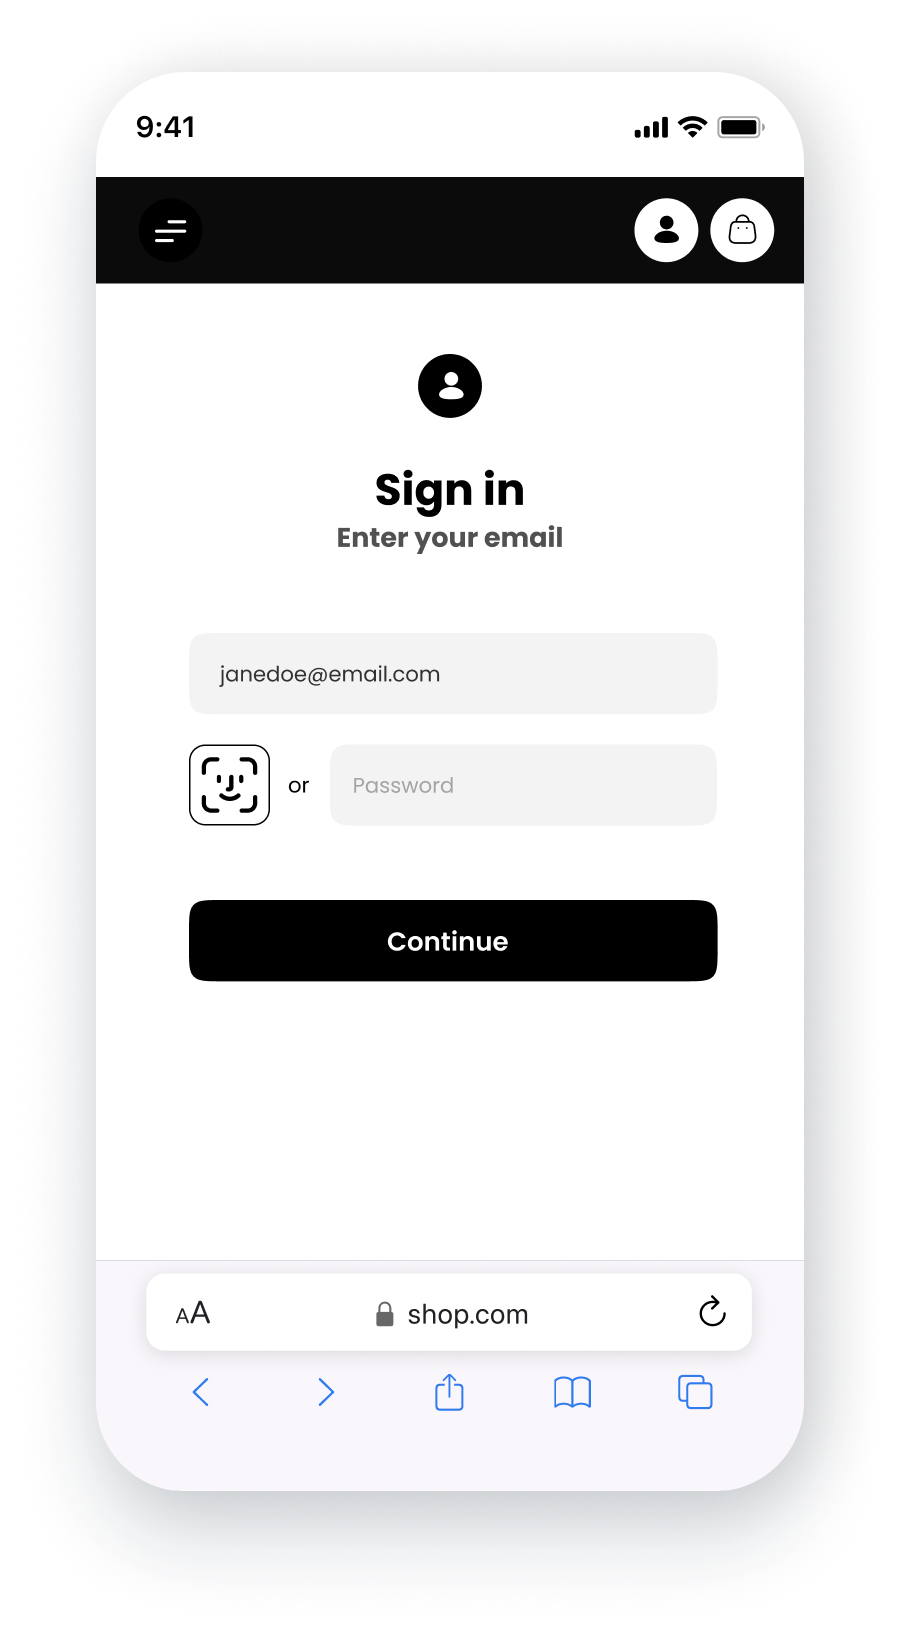 Figure 1. After implementation (example)
### Step 1 - Install OwnID Web SDK
The OwnID Web SDK provides communication between your frontend login page and the OwnID cloud server.
If you're using React or Angular frameworks, and you haven't yet installed the OwnID SDK on your local system, you should do that now before continuing.
To install the React-based or the Angular-based SDK, select the tab that matches your framework and copy the npm command shown.
Figure 1. After implementation (example)
### Step 1 - Install OwnID Web SDK
The OwnID Web SDK provides communication between your frontend login page and the OwnID cloud server.
If you're using React or Angular frameworks, and you haven't yet installed the OwnID SDK on your local system, you should do that now before continuing.
To install the React-based or the Angular-based SDK, select the tab that matches your framework and copy the npm command shown.
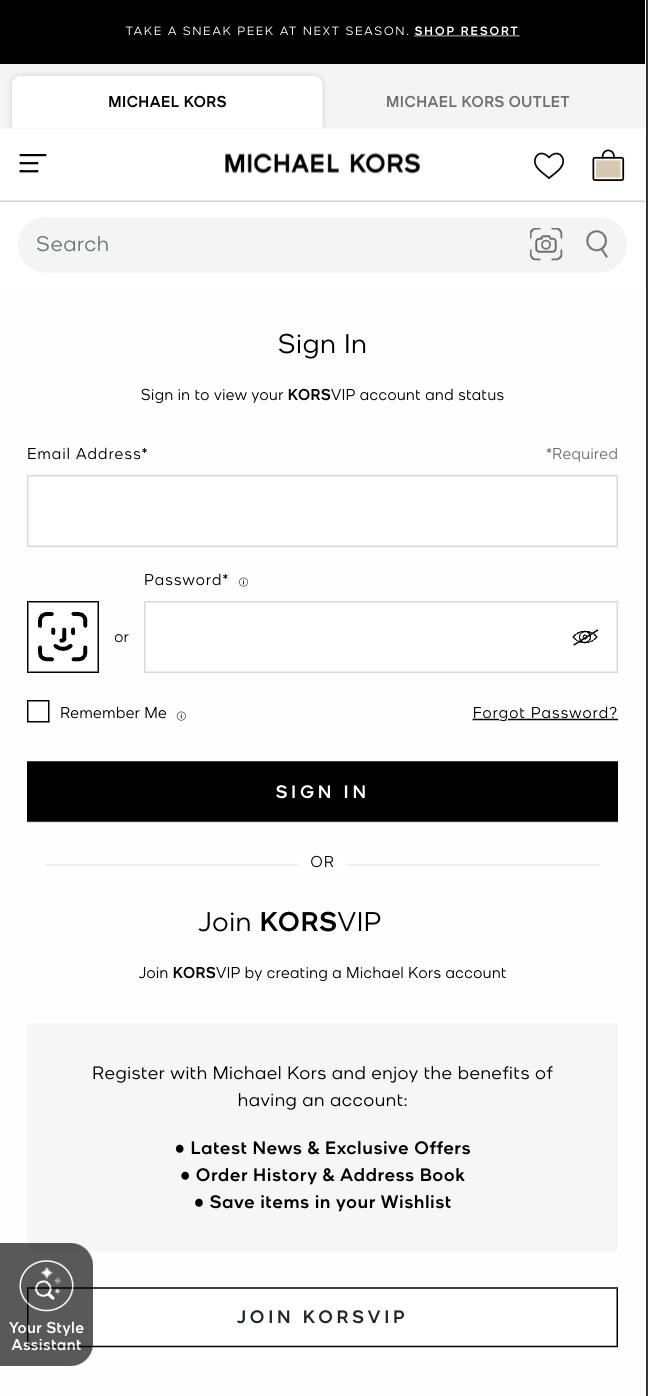 Default button variant (Example for michaelkors.com)
The default implementation places the OwnID button side by side with the password field. This is the standard configuration and requires no additional parameters.
If you would like to style this button, you can do it in the OwnID Console or utilize the following CSS variables:
```css theme={null}
ownid-fingerprint-button-widget {
--ownid-button-widget-border-radius;
--ownid-button-widget-font-size;
--ownid-button-widget-color;
--ownid-button-widget-border-color;
--ownid-button-widget-check-size;
--ownid-button-widget-check-position-top;
--ownid-button-widget-check-position-right;
z-index;
}
```
### Standalone Button
Default button variant (Example for michaelkors.com)
The default implementation places the OwnID button side by side with the password field. This is the standard configuration and requires no additional parameters.
If you would like to style this button, you can do it in the OwnID Console or utilize the following CSS variables:
```css theme={null}
ownid-fingerprint-button-widget {
--ownid-button-widget-border-radius;
--ownid-button-widget-font-size;
--ownid-button-widget-color;
--ownid-button-widget-border-color;
--ownid-button-widget-check-size;
--ownid-button-widget-check-position-top;
--ownid-button-widget-check-position-right;
z-index;
}
```
### Standalone Button
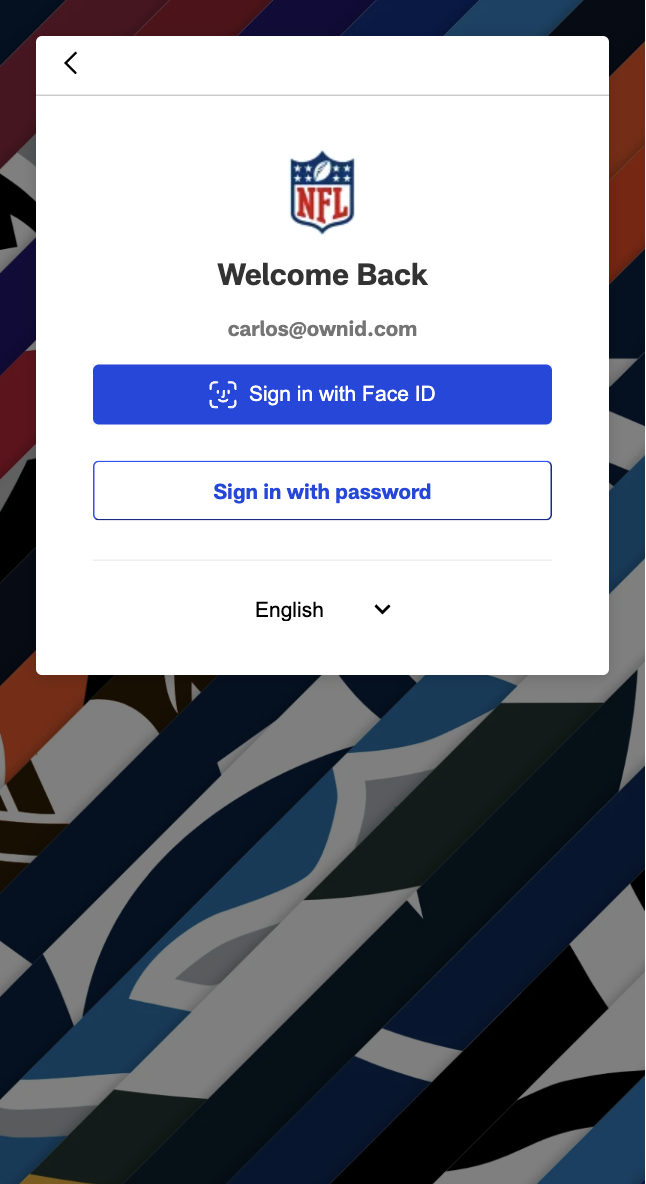 Standalone button variant (Example for nfl.com)
For cases where you want to position the OwnID button independently from the password field, use the standalone button variant:
```javascript theme={null}
ownid('login', {
variant: 'standalone-button',
infoTooltip: false,
loginIdField: document.querySelector('#email'),
element: document.getElementById('button-wrapper-div'),
// other configuration options...
});
```
In the code sample above, `button-wrapper-div` represents the div where the button will be shown. Configure your own.
If you would like to style this button, you can utilize the following CSS variables:
```css theme={null}
ownid-standalone-button-widget {
height: 40px;
--ownid-button-width: 100%;
width: 100%;
--ownid-button-widget-border-color;
--ownid-button-widget-border-radius;
--ownid-button-widget-font-size;
--ownid-button-widget-font-weight;
--ownid-button-widget-color;
--ownid-button-widget-icon-height;
--ownid-button-widget-icon-stroke-width;
--ownid-button-widget-check-size;
--ownid-button-widget-check-position-top;
--ownid-button-widget-check-position-right;
}
```
### Custom Button
For complete control over the button's appearance, you can create your own custom button or HTML element. To implement this:
1. Create your custom button element:
```html theme={null}
```
2. Trigger the OwnID login flow by calling the `ownid.auth` function:
```javascript theme={null}
const email = document.getElementById('email').value;
ownid('auth', email);
```
This approach gives you full control over the button's styling while maintaining OwnID's functionality.
## Next Steps
### Ready to deploy?
Standalone button variant (Example for nfl.com)
For cases where you want to position the OwnID button independently from the password field, use the standalone button variant:
```javascript theme={null}
ownid('login', {
variant: 'standalone-button',
infoTooltip: false,
loginIdField: document.querySelector('#email'),
element: document.getElementById('button-wrapper-div'),
// other configuration options...
});
```
In the code sample above, `button-wrapper-div` represents the div where the button will be shown. Configure your own.
If you would like to style this button, you can utilize the following CSS variables:
```css theme={null}
ownid-standalone-button-widget {
height: 40px;
--ownid-button-width: 100%;
width: 100%;
--ownid-button-widget-border-color;
--ownid-button-widget-border-radius;
--ownid-button-widget-font-size;
--ownid-button-widget-font-weight;
--ownid-button-widget-color;
--ownid-button-widget-icon-height;
--ownid-button-widget-icon-stroke-width;
--ownid-button-widget-check-size;
--ownid-button-widget-check-position-top;
--ownid-button-widget-check-position-right;
}
```
### Custom Button
For complete control over the button's appearance, you can create your own custom button or HTML element. To implement this:
1. Create your custom button element:
```html theme={null}
```
2. Trigger the OwnID login flow by calling the `ownid.auth` function:
```javascript theme={null}
const email = document.getElementById('email').value;
ownid('auth', email);
```
This approach gives you full control over the button's styling while maintaining OwnID's functionality.
## Next Steps
### Ready to deploy?