> ## Documentation Index
> Fetch the complete documentation index at: https://docs.ownid.com/llms.txt
> Use this file to discover all available pages before exploring further.
# Ping Advanced Identity Cloud
> Integrate OwnID password free authentication into your Ping Advanced Identity Cloud flow
By integrating Ping Advanced Identity Cloud with OwnID, you can implement the full set of OwnID features to simplify and streamline your user login experience.
## How it Works
OwnID supports integration with Ping Advanced Identity Cloud through our pre-built Ping Advanced Identity Cloud Connector.
Configuration on the Ping Advanced Identity Cloud side happens through your AIC Dashboard. Ensure you have an account with admin access in Ping Advanced Identity Cloud.
Complete these five basic steps to integrate OwnID with Ping Advanced Identity Cloud:
**Step 1** - Create a service account
**Step 2** - Create the OwnID App
**Step 3** - Define a custom user attribute
**Step 4** - Configure screen flows
**Step 5** - Frontend Integration
## Step 1 - Create a service account
Create a new service account with the `fr:idm:*` scope. You should get service account id and a private JWK file.
These two values, along with the tenant FQDN and realm are the values required for the integration configuration in OwnID.
Reference: [https://docs.pingidentity.com/pingoneaic/latest/tenants/service-accounts.html#create-a-new-service-account](https://docs.pingidentity.com/pingoneaic/latest/tenants/service-accounts.html#create-a-new-service-account)
## Step 2 - Create the OwnID App
We'll create a new OwnID app using the Ping Advanced Identity Cloud Connector.
An OwnID App is what connects the existing identity provider used by your website with the OwnID widget you insert on the front end.
 OwnID widget
Each of your OwnID Apps acts as the central point of configuration for each of your integrations. These no-code Apps are created, hosted, and maintained entirely within the OwnID Console environment.
When you create an App, it's assigned a unique `appId` automatically. Use that `appId` in OwnID SDK interaction from your website’s front end.
### To Create an OwnID App
Please contact the OwnID team to create a new OwnID app with Ping Advanced Identity Cloud Connector.
## Step 3 - Define a custom user attribute
1. Go to AIC dashboard
2. Go to **Native Consoles** > **Identity Management**.
3. Click **Configure** > **Managed Objects** and click **Alpha\_user**.
4. On the **Alpha\_user** page, click `Add a property`.
5. Create property `custom_ownIdConnections` of type *string*.
6. Edit it and fill in:
7. Title: `ownIdConnections`
8. Description: `OwnID Authentication Connections`
9. Enable only the **Viewable** toggle
**Securing User's Personal Data**
OwnID does not store or process any user data. Users' public keys and device information are stored on your platform.
Private keys are kept exclusively on the user's device and are never transmitted elsewhere.
## Step 4 - Configure screen flows
### Login screen
1. Go to AIC dashboard
2. Go to **Journeys** > **Custom Nodes** and create a new custom node with the name `OwnID Validator` and type `Basic Authentication`.
In the **Properties** tab, configure one property with the name `ownIdAppUrl`, the label `OwnID AppUrl` and type `string`. Make it required.
OwnID widget
Each of your OwnID Apps acts as the central point of configuration for each of your integrations. These no-code Apps are created, hosted, and maintained entirely within the OwnID Console environment.
When you create an App, it's assigned a unique `appId` automatically. Use that `appId` in OwnID SDK interaction from your website’s front end.
### To Create an OwnID App
Please contact the OwnID team to create a new OwnID app with Ping Advanced Identity Cloud Connector.
## Step 3 - Define a custom user attribute
1. Go to AIC dashboard
2. Go to **Native Consoles** > **Identity Management**.
3. Click **Configure** > **Managed Objects** and click **Alpha\_user**.
4. On the **Alpha\_user** page, click `Add a property`.
5. Create property `custom_ownIdConnections` of type *string*.
6. Edit it and fill in:
7. Title: `ownIdConnections`
8. Description: `OwnID Authentication Connections`
9. Enable only the **Viewable** toggle
**Securing User's Personal Data**
OwnID does not store or process any user data. Users' public keys and device information are stored on your platform.
Private keys are kept exclusively on the user's device and are never transmitted elsewhere.
## Step 4 - Configure screen flows
### Login screen
1. Go to AIC dashboard
2. Go to **Journeys** > **Custom Nodes** and create a new custom node with the name `OwnID Validator` and type `Basic Authentication`.
In the **Properties** tab, configure one property with the name `ownIdAppUrl`, the label `OwnID AppUrl` and type `string`. Make it required.
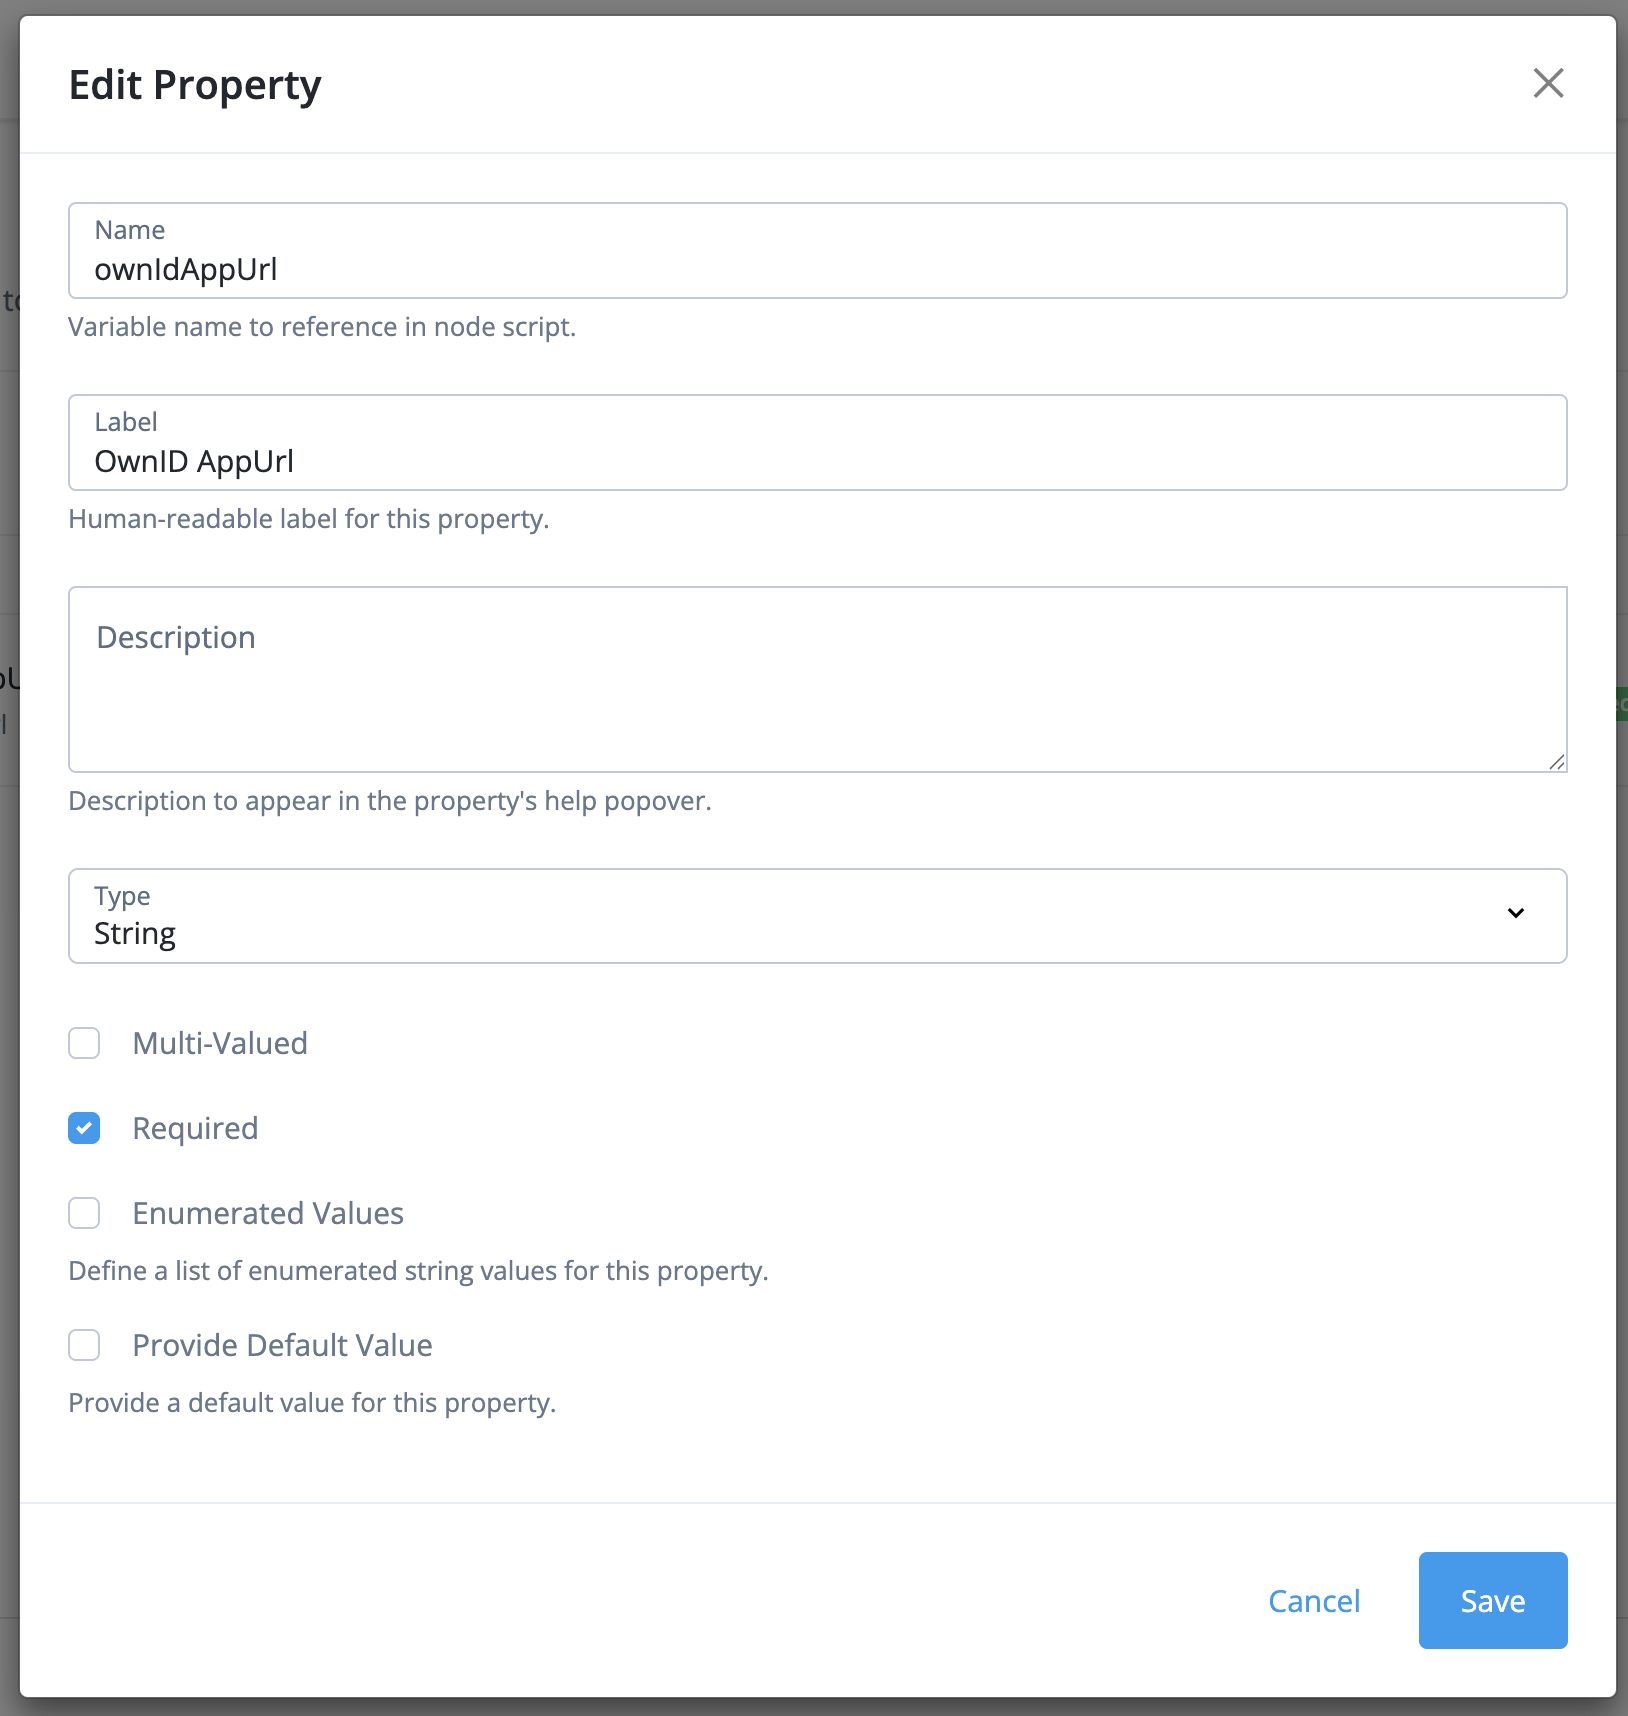 Custom node properties
In the **Settings** tab, add the `true` and `error` outcomes.
Custom node properties
In the **Settings** tab, add the `true` and `error` outcomes.
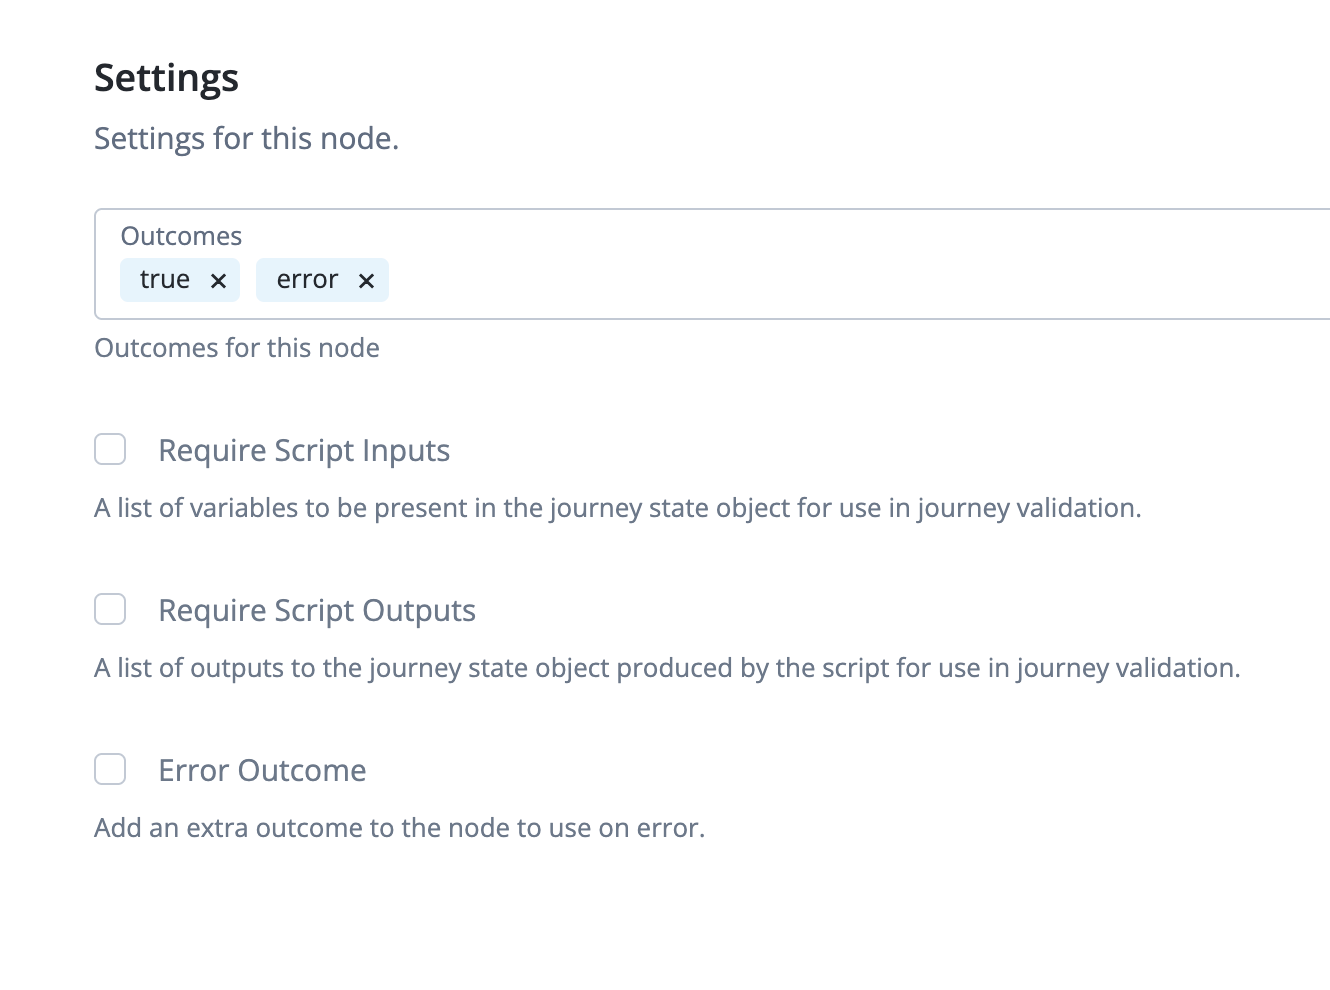 Custom node settings
For **Script**, set the following content:
```javascript theme={null}
var ownIdAppUrl = properties.ownIdAppUrl.replace(/^https?:\/\//, "").replace(/\/$/, "");
var jwksUrl = "https://" + ownIdAppUrl + "/oidc/jwks";
var expectedIss = ownIdAppUrl;
var expectedAud = ownIdAppUrl;
var email = nodeState.get("username");
if (!email) {
logger.error("No email!");
action.goTo("error");
}
var objAttrs = nodeState.get("objectAttributes");
if (objAttrs) {
var token = objAttrs.get("custom_ownIdConnections");
if (token) {
function parseJwtHeader(jwt) {
var parts = jwt.split(".");
if (parts.length < 2) throw "invalid_jwt";
return JSON.parse(utils.base64url.decode(parts[0]));
}
try {
var header = parseJwtHeader(token);
var kid = header.kid;
if (!kid) {
throw "missing_kid";
}
var resp = httpClient
.send(jwksUrl, {
method: "GET",
headers: { Accept: "application/json" },
})
.get();
if (resp.status !== 200) {
throw "jwks_http_" + resp.status;
}
var jwks = resp.json();
if (!jwks || !jwks.keys || !jwks.keys.length) {
throw "jwks_no_keys";
}
logger.info("JWKS: " + JSON.stringify(jwks));
var jwk = null;
for (var i = 0; i < jwks.keys.length; i++) {
if (jwks.keys[i].kid === kid) {
jwk = jwks.keys[i];
break;
}
}
if (!jwk) {
throw "kid_not_found";
}
var signingKeyB64 = utils.base64.encode(JSON.stringify(jwk));
var claims = jwtValidator.validateJwtClaims({
jwtType: "SIGNED",
jwt: token,
subject: "Email:".concat(email),
issuer: expectedIss,
audience: expectedAud,
signingKey: signingKeyB64,
});
if (claims) {
logger.info("success!: " + JSON.stringify(claims));
var authDetails = claims.authorization_details;
if (!authDetails) {
logger.error("Missing authorization_details");
action.goTo("error");
} else {
var authDetailsArray = JSON.parse(JSON.stringify(authDetails));
if (!Array.isArray(authDetailsArray) || authDetailsArray.length === 0) {
logger.error("Invalid authorization_details format");
action.goTo("error");
} else {
var hasSessionCreation = false;
for (var i = 0; i < authDetailsArray.length; i++) {
if (authDetailsArray[i].type === "SessionCreation") {
hasSessionCreation = true;
break;
}
}
if (!hasSessionCreation) {
logger.error("authorization_details missing type: SessionCreation");
action.goTo("error");
} else {
action.goTo("true");
}
}
}
} else {
logger.error("No claims!");
action.goTo("error");
}
} catch (e) {
logger.error("Error validating token");
logger.error(e);
action.goTo("error");
}
} else {
logger.warn("No token!");
action.goTo("error");
}
} else {
logger.warn("No object attributes!");
action.goTo("error");
}
```
3. Go to **Journeys** > **Journeys** and create a new journey with following nodes:
* Add a **Page Node**
* In this node, add a **Username Collector**
* Also in this node, add an **Attribute Collector** widget. To **Attributes to Collect** add the value `custom_ownIdConnections`. Mark all attributes as required. **Identity Attribute** should rename `userName`.
4. Add the custom **OwnID Validator** node created above, configure its `OwnID AppUrl` to the App URL you received in step 2. Connect the **Page Node** node to this new node.
5. Finish the flow by connecting the **OwnID Validator** node to your journey completion logic.
Custom node settings
For **Script**, set the following content:
```javascript theme={null}
var ownIdAppUrl = properties.ownIdAppUrl.replace(/^https?:\/\//, "").replace(/\/$/, "");
var jwksUrl = "https://" + ownIdAppUrl + "/oidc/jwks";
var expectedIss = ownIdAppUrl;
var expectedAud = ownIdAppUrl;
var email = nodeState.get("username");
if (!email) {
logger.error("No email!");
action.goTo("error");
}
var objAttrs = nodeState.get("objectAttributes");
if (objAttrs) {
var token = objAttrs.get("custom_ownIdConnections");
if (token) {
function parseJwtHeader(jwt) {
var parts = jwt.split(".");
if (parts.length < 2) throw "invalid_jwt";
return JSON.parse(utils.base64url.decode(parts[0]));
}
try {
var header = parseJwtHeader(token);
var kid = header.kid;
if (!kid) {
throw "missing_kid";
}
var resp = httpClient
.send(jwksUrl, {
method: "GET",
headers: { Accept: "application/json" },
})
.get();
if (resp.status !== 200) {
throw "jwks_http_" + resp.status;
}
var jwks = resp.json();
if (!jwks || !jwks.keys || !jwks.keys.length) {
throw "jwks_no_keys";
}
logger.info("JWKS: " + JSON.stringify(jwks));
var jwk = null;
for (var i = 0; i < jwks.keys.length; i++) {
if (jwks.keys[i].kid === kid) {
jwk = jwks.keys[i];
break;
}
}
if (!jwk) {
throw "kid_not_found";
}
var signingKeyB64 = utils.base64.encode(JSON.stringify(jwk));
var claims = jwtValidator.validateJwtClaims({
jwtType: "SIGNED",
jwt: token,
subject: "Email:".concat(email),
issuer: expectedIss,
audience: expectedAud,
signingKey: signingKeyB64,
});
if (claims) {
logger.info("success!: " + JSON.stringify(claims));
var authDetails = claims.authorization_details;
if (!authDetails) {
logger.error("Missing authorization_details");
action.goTo("error");
} else {
var authDetailsArray = JSON.parse(JSON.stringify(authDetails));
if (!Array.isArray(authDetailsArray) || authDetailsArray.length === 0) {
logger.error("Invalid authorization_details format");
action.goTo("error");
} else {
var hasSessionCreation = false;
for (var i = 0; i < authDetailsArray.length; i++) {
if (authDetailsArray[i].type === "SessionCreation") {
hasSessionCreation = true;
break;
}
}
if (!hasSessionCreation) {
logger.error("authorization_details missing type: SessionCreation");
action.goTo("error");
} else {
action.goTo("true");
}
}
}
} else {
logger.error("No claims!");
action.goTo("error");
}
} catch (e) {
logger.error("Error validating token");
logger.error(e);
action.goTo("error");
}
} else {
logger.warn("No token!");
action.goTo("error");
}
} else {
logger.warn("No object attributes!");
action.goTo("error");
}
```
3. Go to **Journeys** > **Journeys** and create a new journey with following nodes:
* Add a **Page Node**
* In this node, add a **Username Collector**
* Also in this node, add an **Attribute Collector** widget. To **Attributes to Collect** add the value `custom_ownIdConnections`. Mark all attributes as required. **Identity Attribute** should rename `userName`.
4. Add the custom **OwnID Validator** node created above, configure its `OwnID AppUrl` to the App URL you received in step 2. Connect the **Page Node** node to this new node.
5. Finish the flow by connecting the **OwnID Validator** node to your journey completion logic.
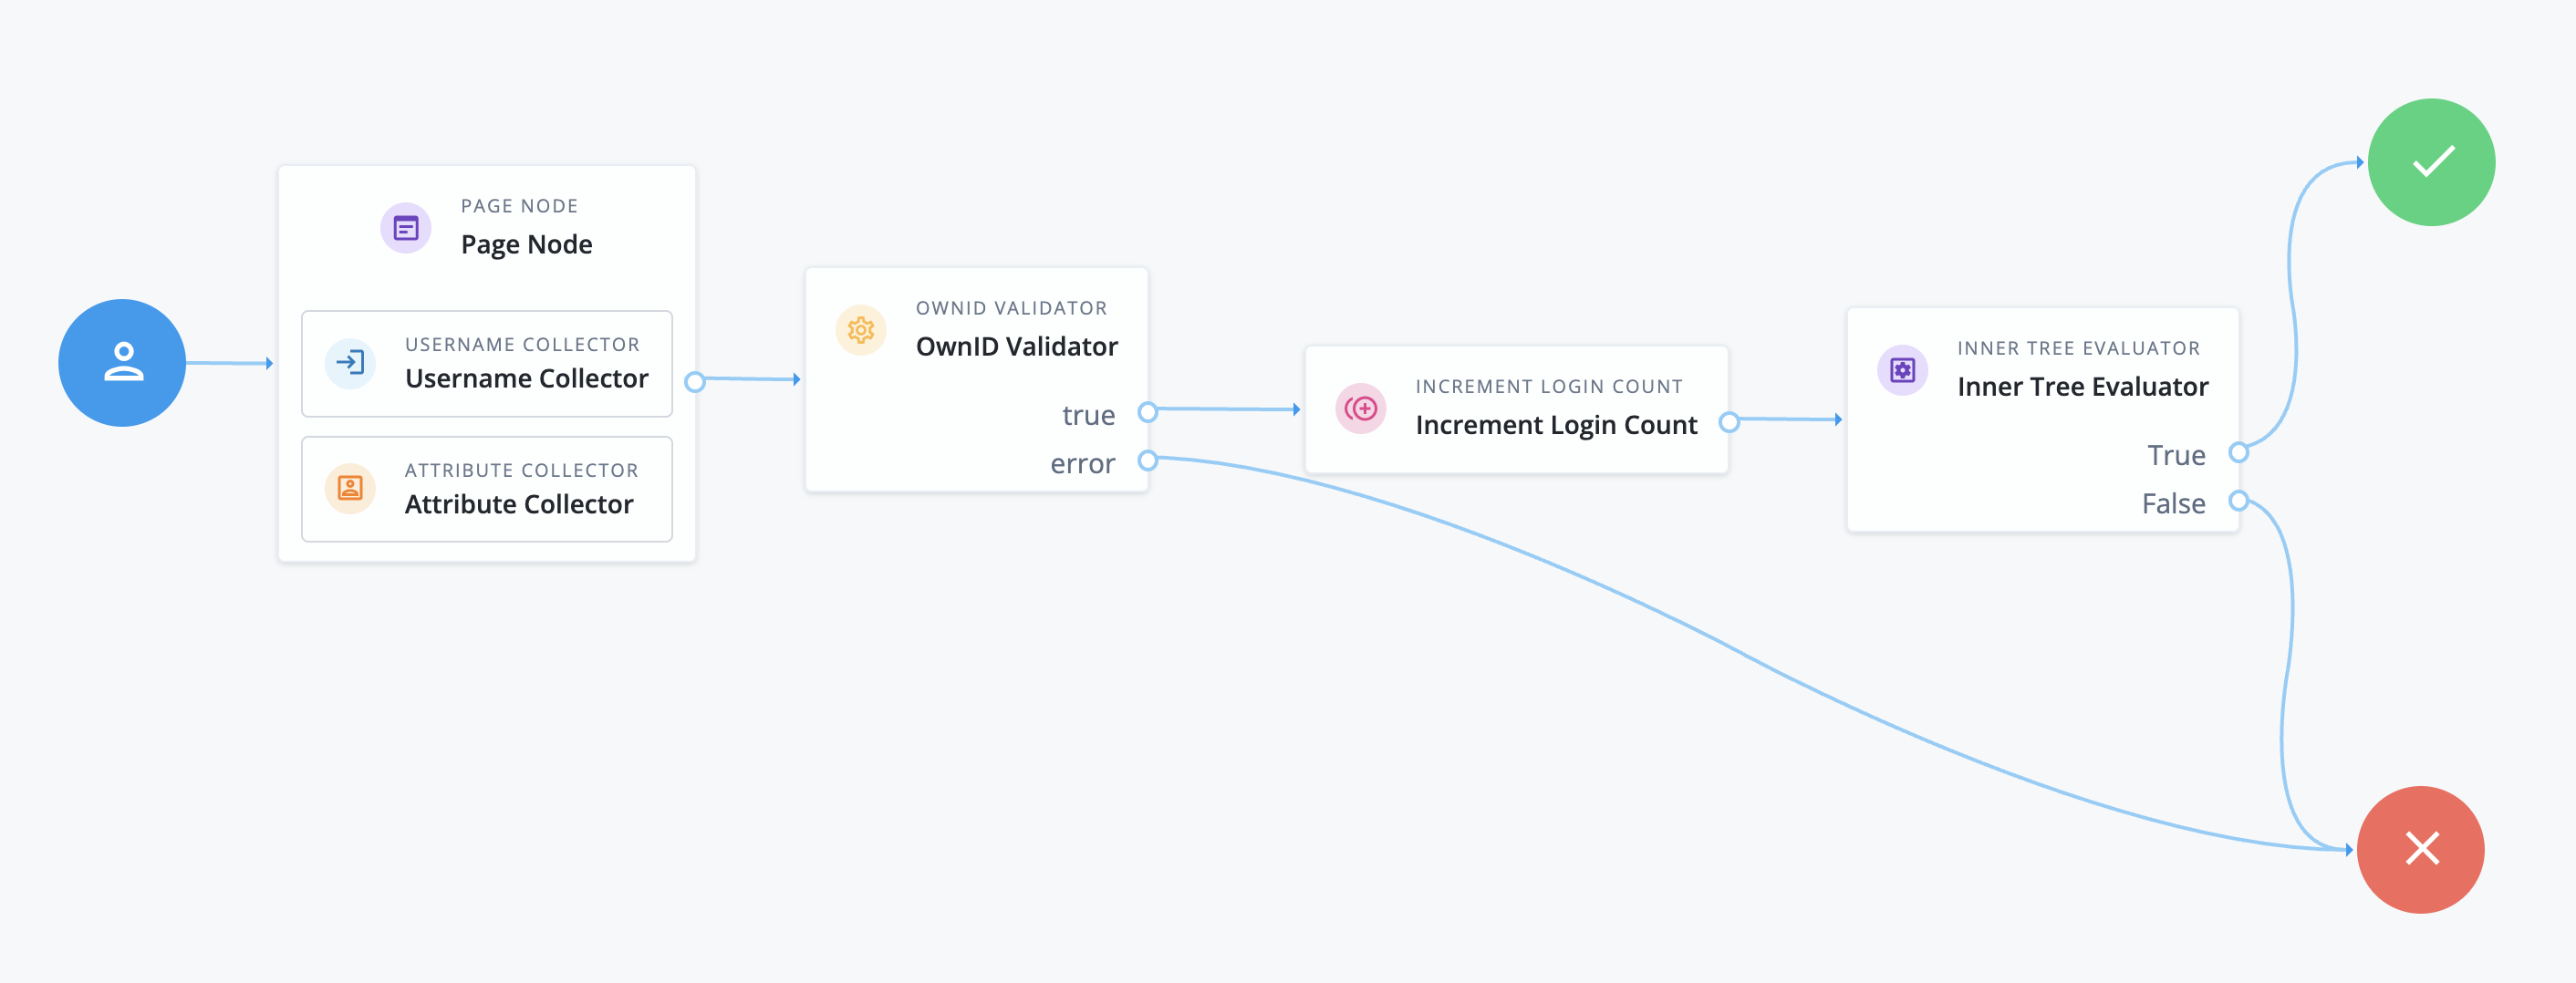 Auth journey example
### Register screen
1. Go to AIC dashboard
2. Go to **Journeys** and click to edit your **Registration** journey
3. In the **Page Node**, select the **Attribute Collector** widget. Add to **Attributes to Collect** the value `custom_ownIdConnections`
## Step 5 - Frontend integration
For the **login** flow, implement the `onLogin` callback to expect a payload with following structure, which you can use to establish a session:
```typescript theme={null}
{
"tokenId": "",
"successUrl": "",
"realm": ""
}
```
For the **register** flow, if OwnID was used to create a passwordless account, you'd need to fill in the `custom_ownIdConnections` attribute when making the registration callback.
The value for this property can be retrieved at form submission time using the following logic, which will return an optional string:
```javascript theme={null}
const hiddenInput = document.querySelector("input#custom_ownIdConnections")
const custom_ownIdConnections = hiddenInput?.value || ""
```
**Congratulations!**
Enjoy your Ping Advanced Identity Cloud-integrated passwordless authentication!
## Next Steps
### Ready to deploy?
Take me to the Deployment Checklist
Auth journey example
### Register screen
1. Go to AIC dashboard
2. Go to **Journeys** and click to edit your **Registration** journey
3. In the **Page Node**, select the **Attribute Collector** widget. Add to **Attributes to Collect** the value `custom_ownIdConnections`
## Step 5 - Frontend integration
For the **login** flow, implement the `onLogin` callback to expect a payload with following structure, which you can use to establish a session:
```typescript theme={null}
{
"tokenId": "",
"successUrl": "",
"realm": ""
}
```
For the **register** flow, if OwnID was used to create a passwordless account, you'd need to fill in the `custom_ownIdConnections` attribute when making the registration callback.
The value for this property can be retrieved at form submission time using the following logic, which will return an optional string:
```javascript theme={null}
const hiddenInput = document.querySelector("input#custom_ownIdConnections")
const custom_ownIdConnections = hiddenInput?.value || ""
```
**Congratulations!**
Enjoy your Ping Advanced Identity Cloud-integrated passwordless authentication!
## Next Steps
### Ready to deploy?
Take me to the Deployment Checklist