> ## Documentation Index
> Fetch the complete documentation index at: https://docs.ownid.com/llms.txt
> Use this file to discover all available pages before exploring further.
# Salesforce Commerce Cloud
> Integrate OwnID into Salesforce Commerce Cloud using a cartridge.
export const connector_name_0 = "SalesForce"
By integrating Salesforce Commerce Cloud (SFCC) with OwnID, you can implement the full set of OwnID features to simplify and streamline your user login experience.
## How it Works
OwnID integrates with the SFCC built-in API client, using our native SFCC Connector and an SFCC *cartridge*.
Integrate OwnID with SFCC by completing these four basic steps:
**Step 1** - Get SFCC Credentials.
**Step 2** - Create an OwnID application in the OwnID Console.
**Step 3** - Install the SFCC Cartridge.
**Step 4** - Add OwnID SDK script to your template.
## Prerequisites
* Download the *Salesforce Commerce Cloud* cartridge [here](https://cdn.ownid.com/dist/ownid_sfcc.zip).
* Have permissions to access and modify SFCC Account Manager and SFCC instance's Administration.
## Step 1 - Add SFCC Client
Integration requires you to create a new API Client in your SFCC instance.
### Create Credentials
See: [Add an API Client in B2C Commerce](https://help.salesforce.com/s/articleView?id=cc.b2c_account_manager_add_api_client_id.htm\&type=5)
1. Log into the SFCC Account Manager.
2. Select *API Client* from the left side menu.
3. Click **Add API Client**.
4. Enter "OwnID Integration" in *Display Name*.
5. Enter a password.
6. Assign your organization.
7. Assign the following roles:
* `Sandbox API User`
* `Salesforce Commerce Cloud`
8. In the *Token Endpoint Auth Method*, select `private_key_jwt`.
9. Click **Save Changes**.
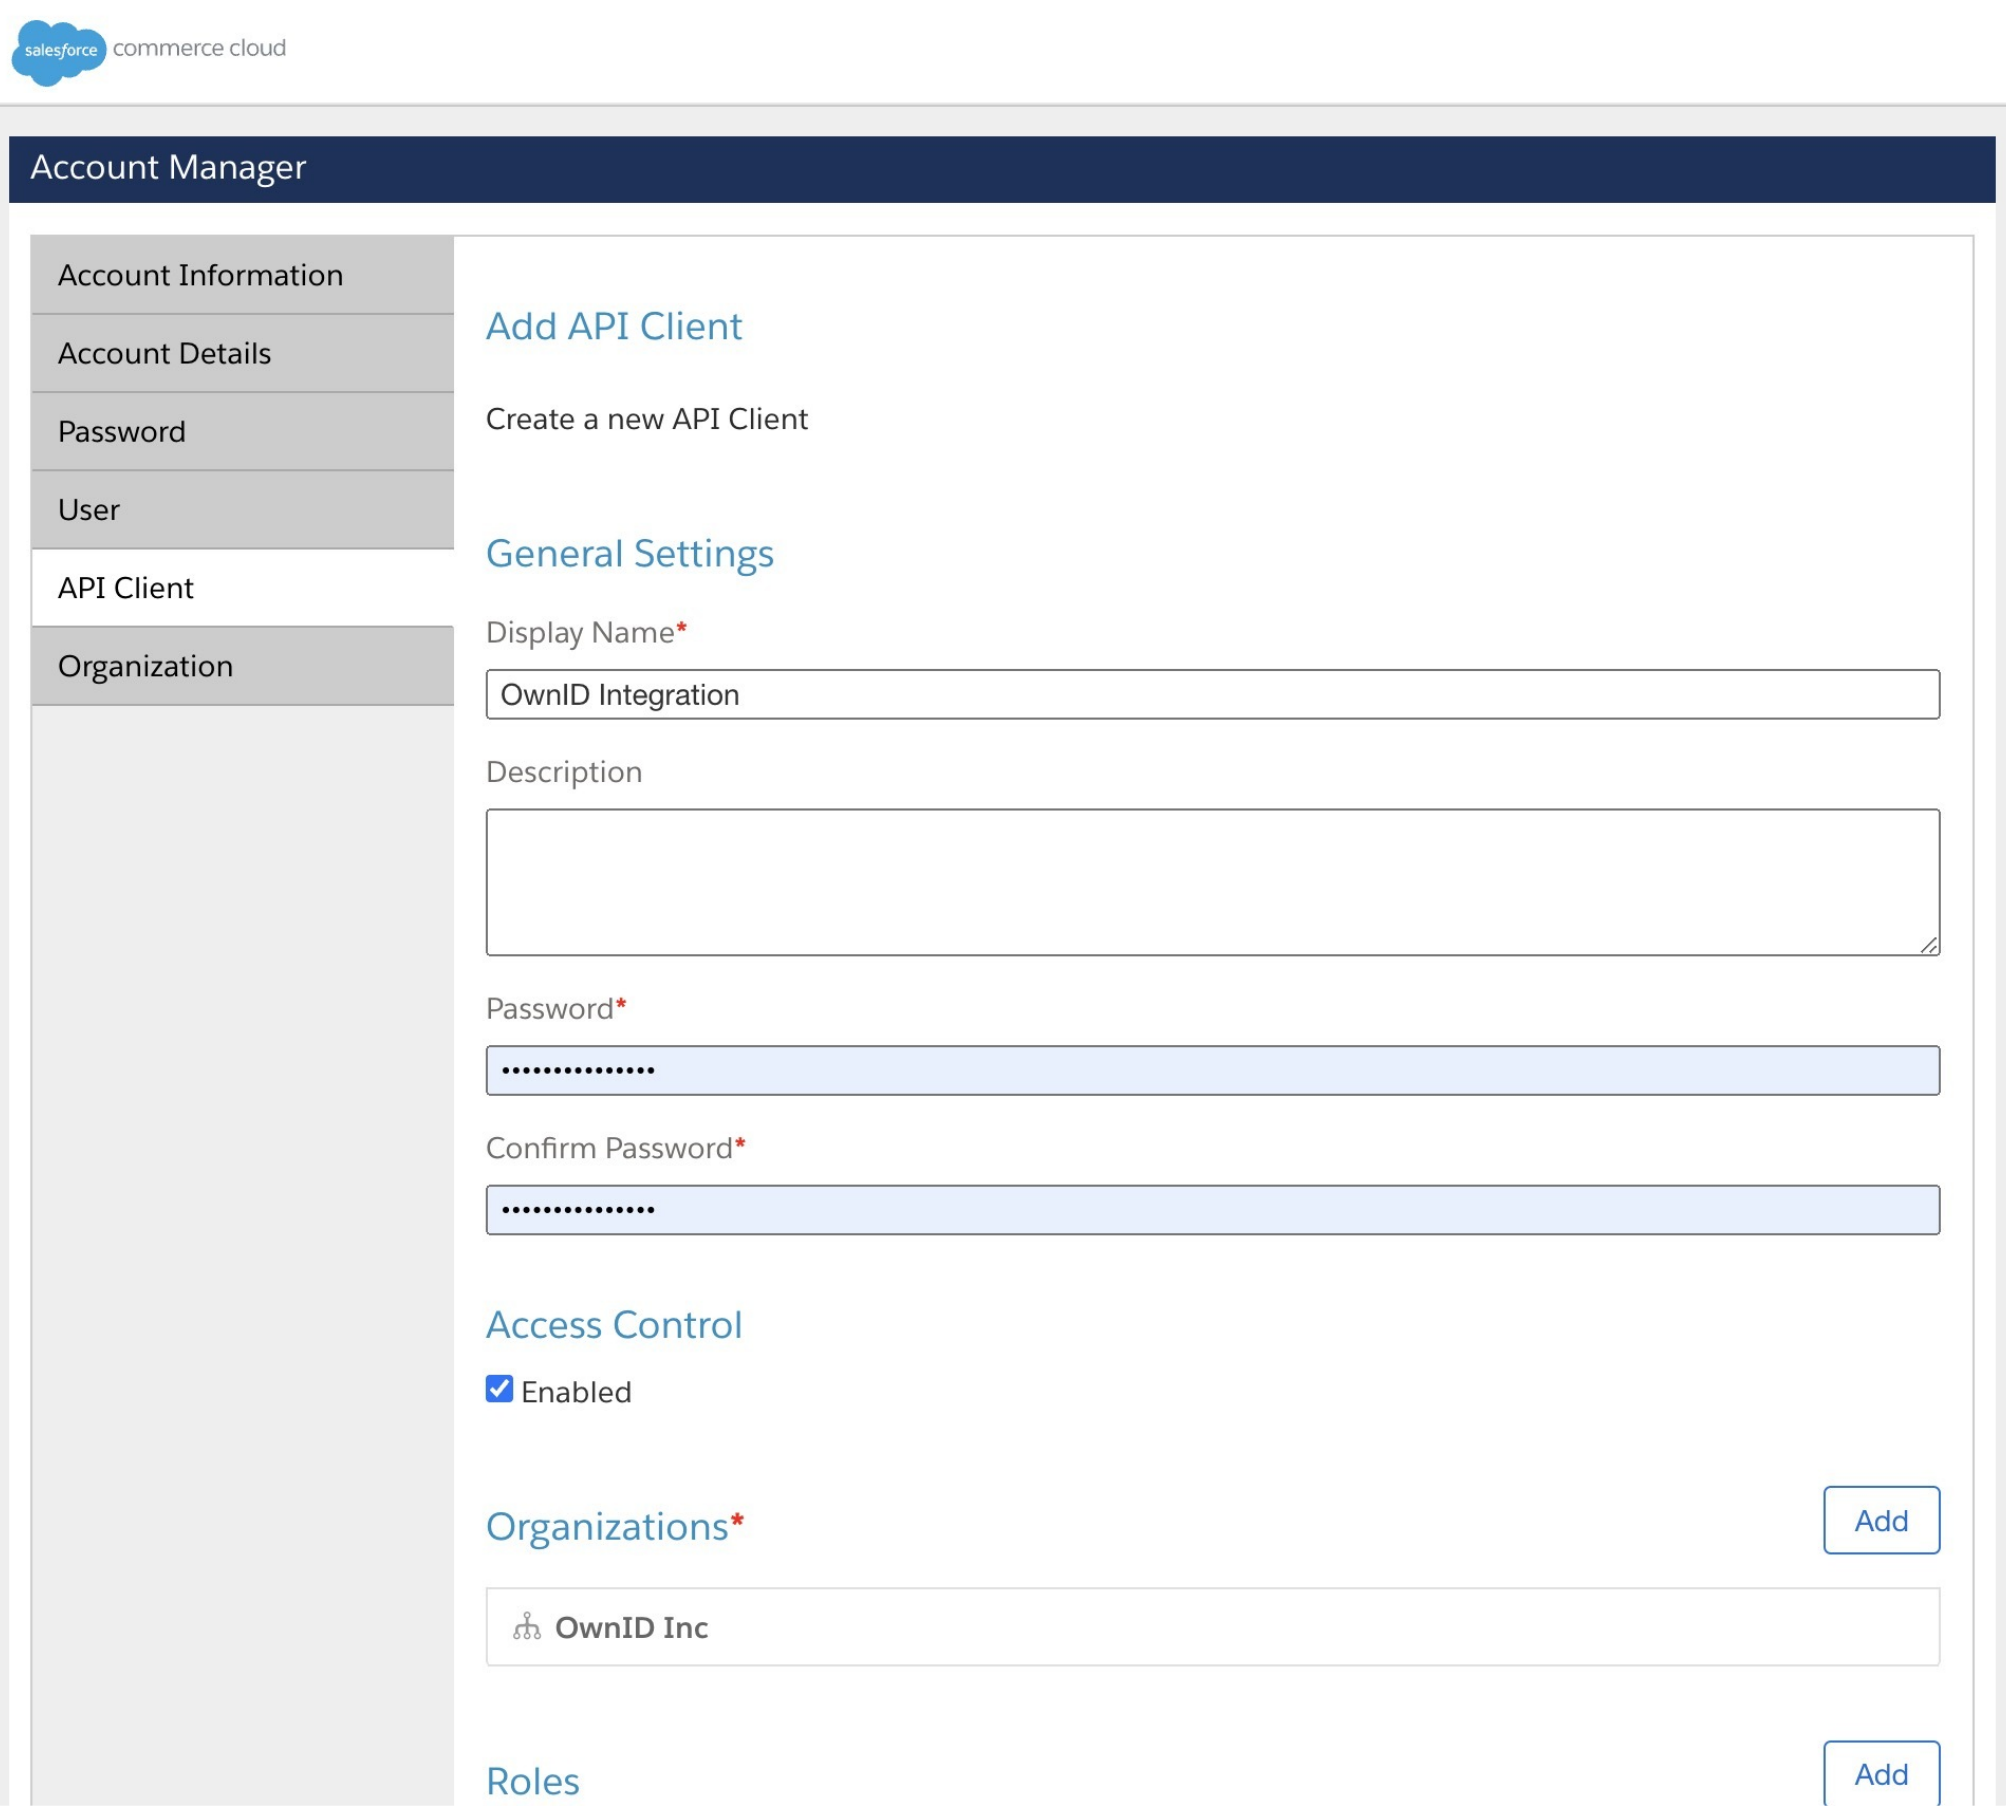 Figure 1. Salesforce API Client Creation
Salesforce displays your `Client Id` and `Secret`. Save these values for later use.
### Test Credentials Locally
After creating the test credentials, you can verify that they work by running the following commands locally. Replace the environment variables with your SFCC values before running the commands.
```bash theme={null}
AUTHORIZATION=$(echo "${USERNAME}:${PASSWORD}:${CLIENT_SECRET}" | base64)
curl --location "https://${HOSTNAME}/dw/oauth2/access_token?client_id=${CLIENT_ID}" \
--header "Authorization: Basic ${AUTHORIZATION}" \
--header "Content-Type: application/x-www-form-urlencoded" \
--data-urlencode "grant_type=urn:demandware:params:oauth:grant-type:client-id:dwsid:dwsecuretoken"
curl --location "https://${HOSTNAME}/s/${STORE}/dw/shop/v23_2/customers/auth/trustedsystem" \
--header "x-dw-client-id: ${CLIENT_ID}" \
--header "Content-Type: application/json" \
--header "Authorization: ${ACCESS_TOKEN}" \
--data-raw '{
"login": "${EMAIL}",
"client_id": "${CLIENT_ID}"
}'
```
### Assign Permissions
1. Go to *Administration > Site Development > Open Commerce API Settings*.
2. Add the following JSON object to the *shop* tab. Change `client_id` value in the following *shop* JSON to match the `Client Id` created in the previous steps.
```json shop tab theme={null}
{
"_v": "23.1",
"clients": [
{
"allowed_origins": [],
"client_id": "Client ID",
"resources": [
{
"resource_id": "/customers/auth/trustedsystem",
"methods": ["post"],
"read_attributes": "(**)",
"write_attributes": "(**)"
},
{
"resource_id": "/sessions",
"methods": ["post"],
"read_attributes": "(**)",
"write_attributes": "(**)"
},
{
"resource_id": "/customers/auth",
"methods": ["post"],
"read_attributes": "(**)",
"write_attributes": "(**)"
},
{
"resource_id": "/customers/*",
"methods": ["get", "patch"],
"read_attributes": "(**)",
"write_attributes": "(**)"
},
{
"resource_id": "/baskets",
"methods": ["post"],
"read_attributes": "(**)",
"write_attributes": "(**)"
},
{
"resource_id": "/customers/*/baskets",
"methods": ["get"],
"read_attributes": "(**)",
"write_attributes": "(**)"
},
{
"resource_id": "/baskets/*/items",
"methods": ["post"],
"read_attributes": "(**)",
"write_attributes": "(**)"
}
]
}
]
}
```
1. Add the following JSON object to the *data* tab. Change `client_id` value in the following *data* JSON to match the `Client Id` created in the previous steps.
```json data tab theme={null}
{
"_v": "23.1",
"clients": [
{
"allowed_origins": [],
"client_id": "Your Client ID",
"resources": [
{
"resource_id": "/sites/*",
"methods": ["get"],
"read_attributes": "(**)",
"write_attributes": "(**)"
},
{
"resource_id": "/customer_lists/*/customers/*",
"methods": ["get", "patch"],
"read_attributes": "(**)",
"write_attributes": "(**)"
},
{
"resource_id":"/customer_lists/*/customer_search",
"methods": ["post"],
"read_attributes": "(**)",
"write_attributes": "(**)"
},
{
"resource_id":"/ocapi_configs/*",
"methods": ["get"],
"read_attributes": "(**)",
"write_attributes": "(**)"
}
]
}
]
}
```
**Securing User's Personal Data**
OwnID does not store or process any user data. Users' public keys and device information are stored on your platform.
Private keys are kept exclusively on the user's device and are never transmitted elsewhere.
## Step 2 - Create OwnID Application
An OwnID App is what connects the existing identity provider used by your website with the OwnID widget you insert on the front end.
Figure 1. Salesforce API Client Creation
Salesforce displays your `Client Id` and `Secret`. Save these values for later use.
### Test Credentials Locally
After creating the test credentials, you can verify that they work by running the following commands locally. Replace the environment variables with your SFCC values before running the commands.
```bash theme={null}
AUTHORIZATION=$(echo "${USERNAME}:${PASSWORD}:${CLIENT_SECRET}" | base64)
curl --location "https://${HOSTNAME}/dw/oauth2/access_token?client_id=${CLIENT_ID}" \
--header "Authorization: Basic ${AUTHORIZATION}" \
--header "Content-Type: application/x-www-form-urlencoded" \
--data-urlencode "grant_type=urn:demandware:params:oauth:grant-type:client-id:dwsid:dwsecuretoken"
curl --location "https://${HOSTNAME}/s/${STORE}/dw/shop/v23_2/customers/auth/trustedsystem" \
--header "x-dw-client-id: ${CLIENT_ID}" \
--header "Content-Type: application/json" \
--header "Authorization: ${ACCESS_TOKEN}" \
--data-raw '{
"login": "${EMAIL}",
"client_id": "${CLIENT_ID}"
}'
```
### Assign Permissions
1. Go to *Administration > Site Development > Open Commerce API Settings*.
2. Add the following JSON object to the *shop* tab. Change `client_id` value in the following *shop* JSON to match the `Client Id` created in the previous steps.
```json shop tab theme={null}
{
"_v": "23.1",
"clients": [
{
"allowed_origins": [],
"client_id": "Client ID",
"resources": [
{
"resource_id": "/customers/auth/trustedsystem",
"methods": ["post"],
"read_attributes": "(**)",
"write_attributes": "(**)"
},
{
"resource_id": "/sessions",
"methods": ["post"],
"read_attributes": "(**)",
"write_attributes": "(**)"
},
{
"resource_id": "/customers/auth",
"methods": ["post"],
"read_attributes": "(**)",
"write_attributes": "(**)"
},
{
"resource_id": "/customers/*",
"methods": ["get", "patch"],
"read_attributes": "(**)",
"write_attributes": "(**)"
},
{
"resource_id": "/baskets",
"methods": ["post"],
"read_attributes": "(**)",
"write_attributes": "(**)"
},
{
"resource_id": "/customers/*/baskets",
"methods": ["get"],
"read_attributes": "(**)",
"write_attributes": "(**)"
},
{
"resource_id": "/baskets/*/items",
"methods": ["post"],
"read_attributes": "(**)",
"write_attributes": "(**)"
}
]
}
]
}
```
1. Add the following JSON object to the *data* tab. Change `client_id` value in the following *data* JSON to match the `Client Id` created in the previous steps.
```json data tab theme={null}
{
"_v": "23.1",
"clients": [
{
"allowed_origins": [],
"client_id": "Your Client ID",
"resources": [
{
"resource_id": "/sites/*",
"methods": ["get"],
"read_attributes": "(**)",
"write_attributes": "(**)"
},
{
"resource_id": "/customer_lists/*/customers/*",
"methods": ["get", "patch"],
"read_attributes": "(**)",
"write_attributes": "(**)"
},
{
"resource_id":"/customer_lists/*/customer_search",
"methods": ["post"],
"read_attributes": "(**)",
"write_attributes": "(**)"
},
{
"resource_id":"/ocapi_configs/*",
"methods": ["get"],
"read_attributes": "(**)",
"write_attributes": "(**)"
}
]
}
]
}
```
**Securing User's Personal Data**
OwnID does not store or process any user data. Users' public keys and device information are stored on your platform.
Private keys are kept exclusively on the user's device and are never transmitted elsewhere.
## Step 2 - Create OwnID Application
An OwnID App is what connects the existing identity provider used by your website with the OwnID widget you insert on the front end.
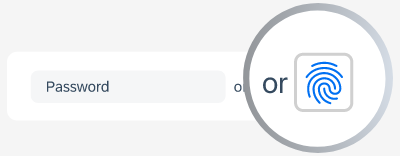 OwnID widget
Each of your OwnID Apps acts as the central point of configuration for each of your integrations. These no-code Apps are created, hosted, and maintained entirely within the OwnID Console environment.
When you create an App, it's assigned a unique `appId` automatically. Use that `appId` in OwnID SDK interaction from your website’s front end.
#### To Create an OwnID App
1. Login to the [OwnID Console](https://console.ownid.com) (or create your account).
2. Click **+Create Application** from the Apps screen.
3. Enter a name for your application in the *App name* field.
4. From the *Choose your integration* panel, select the *{connector_name_0}* tile.
OwnID widget
Each of your OwnID Apps acts as the central point of configuration for each of your integrations. These no-code Apps are created, hosted, and maintained entirely within the OwnID Console environment.
When you create an App, it's assigned a unique `appId` automatically. Use that `appId` in OwnID SDK interaction from your website’s front end.
#### To Create an OwnID App
1. Login to the [OwnID Console](https://console.ownid.com) (or create your account).
2. Click **+Create Application** from the Apps screen.
3. Enter a name for your application in the *App name* field.
4. From the *Choose your integration* panel, select the *{connector_name_0}* tile.  5. Click **Next**.
6. Enter the website URL to your *{connector_name_0}* application instance and click **Continue**.
7. Click **Explore my App** on the "Congratulations" popup.
5. Click **Next**.
6. Enter the website URL to your *{connector_name_0}* application instance and click **Continue**.
7. Click **Explore my App** on the "Congratulations" popup.  8. From the *OwnID Settings* panel, copy the *App ID* and the *Shared Secret* for use in configuration on the *{connector_name_0}* side.
  Your OwnID application and secret key are created and you're ready for next steps!
### Salesforce Commerce Integration Configuration
1. Open the Salesforce integration page in the OwnID Console.
2. Enter the *Instance Hostname* - *e.g: xyzb-001.dx.commercecloud.salesforce.com* (only the domain, without protocol).
3. Enter a *Site ID* - *e.g: RefArch* (case sensitive).
4. Enter the *API Client ID* (generated in the previous step).
5. Enter the *API Client Secret* (generated in the previous step).
6. Enter the *SFCC Username* (get it from the Account Manager).
7. Enter the SFCC Password.
8. Click **Save Changes**.
Your OwnID application and secret key are created and you're ready for next steps!
### Salesforce Commerce Integration Configuration
1. Open the Salesforce integration page in the OwnID Console.
2. Enter the *Instance Hostname* - *e.g: xyzb-001.dx.commercecloud.salesforce.com* (only the domain, without protocol).
3. Enter a *Site ID* - *e.g: RefArch* (case sensitive).
4. Enter the *API Client ID* (generated in the previous step).
5. Enter the *API Client Secret* (generated in the previous step).
6. Enter the *SFCC Username* (get it from the Account Manager).
7. Enter the SFCC Password.
8. Click **Save Changes**.
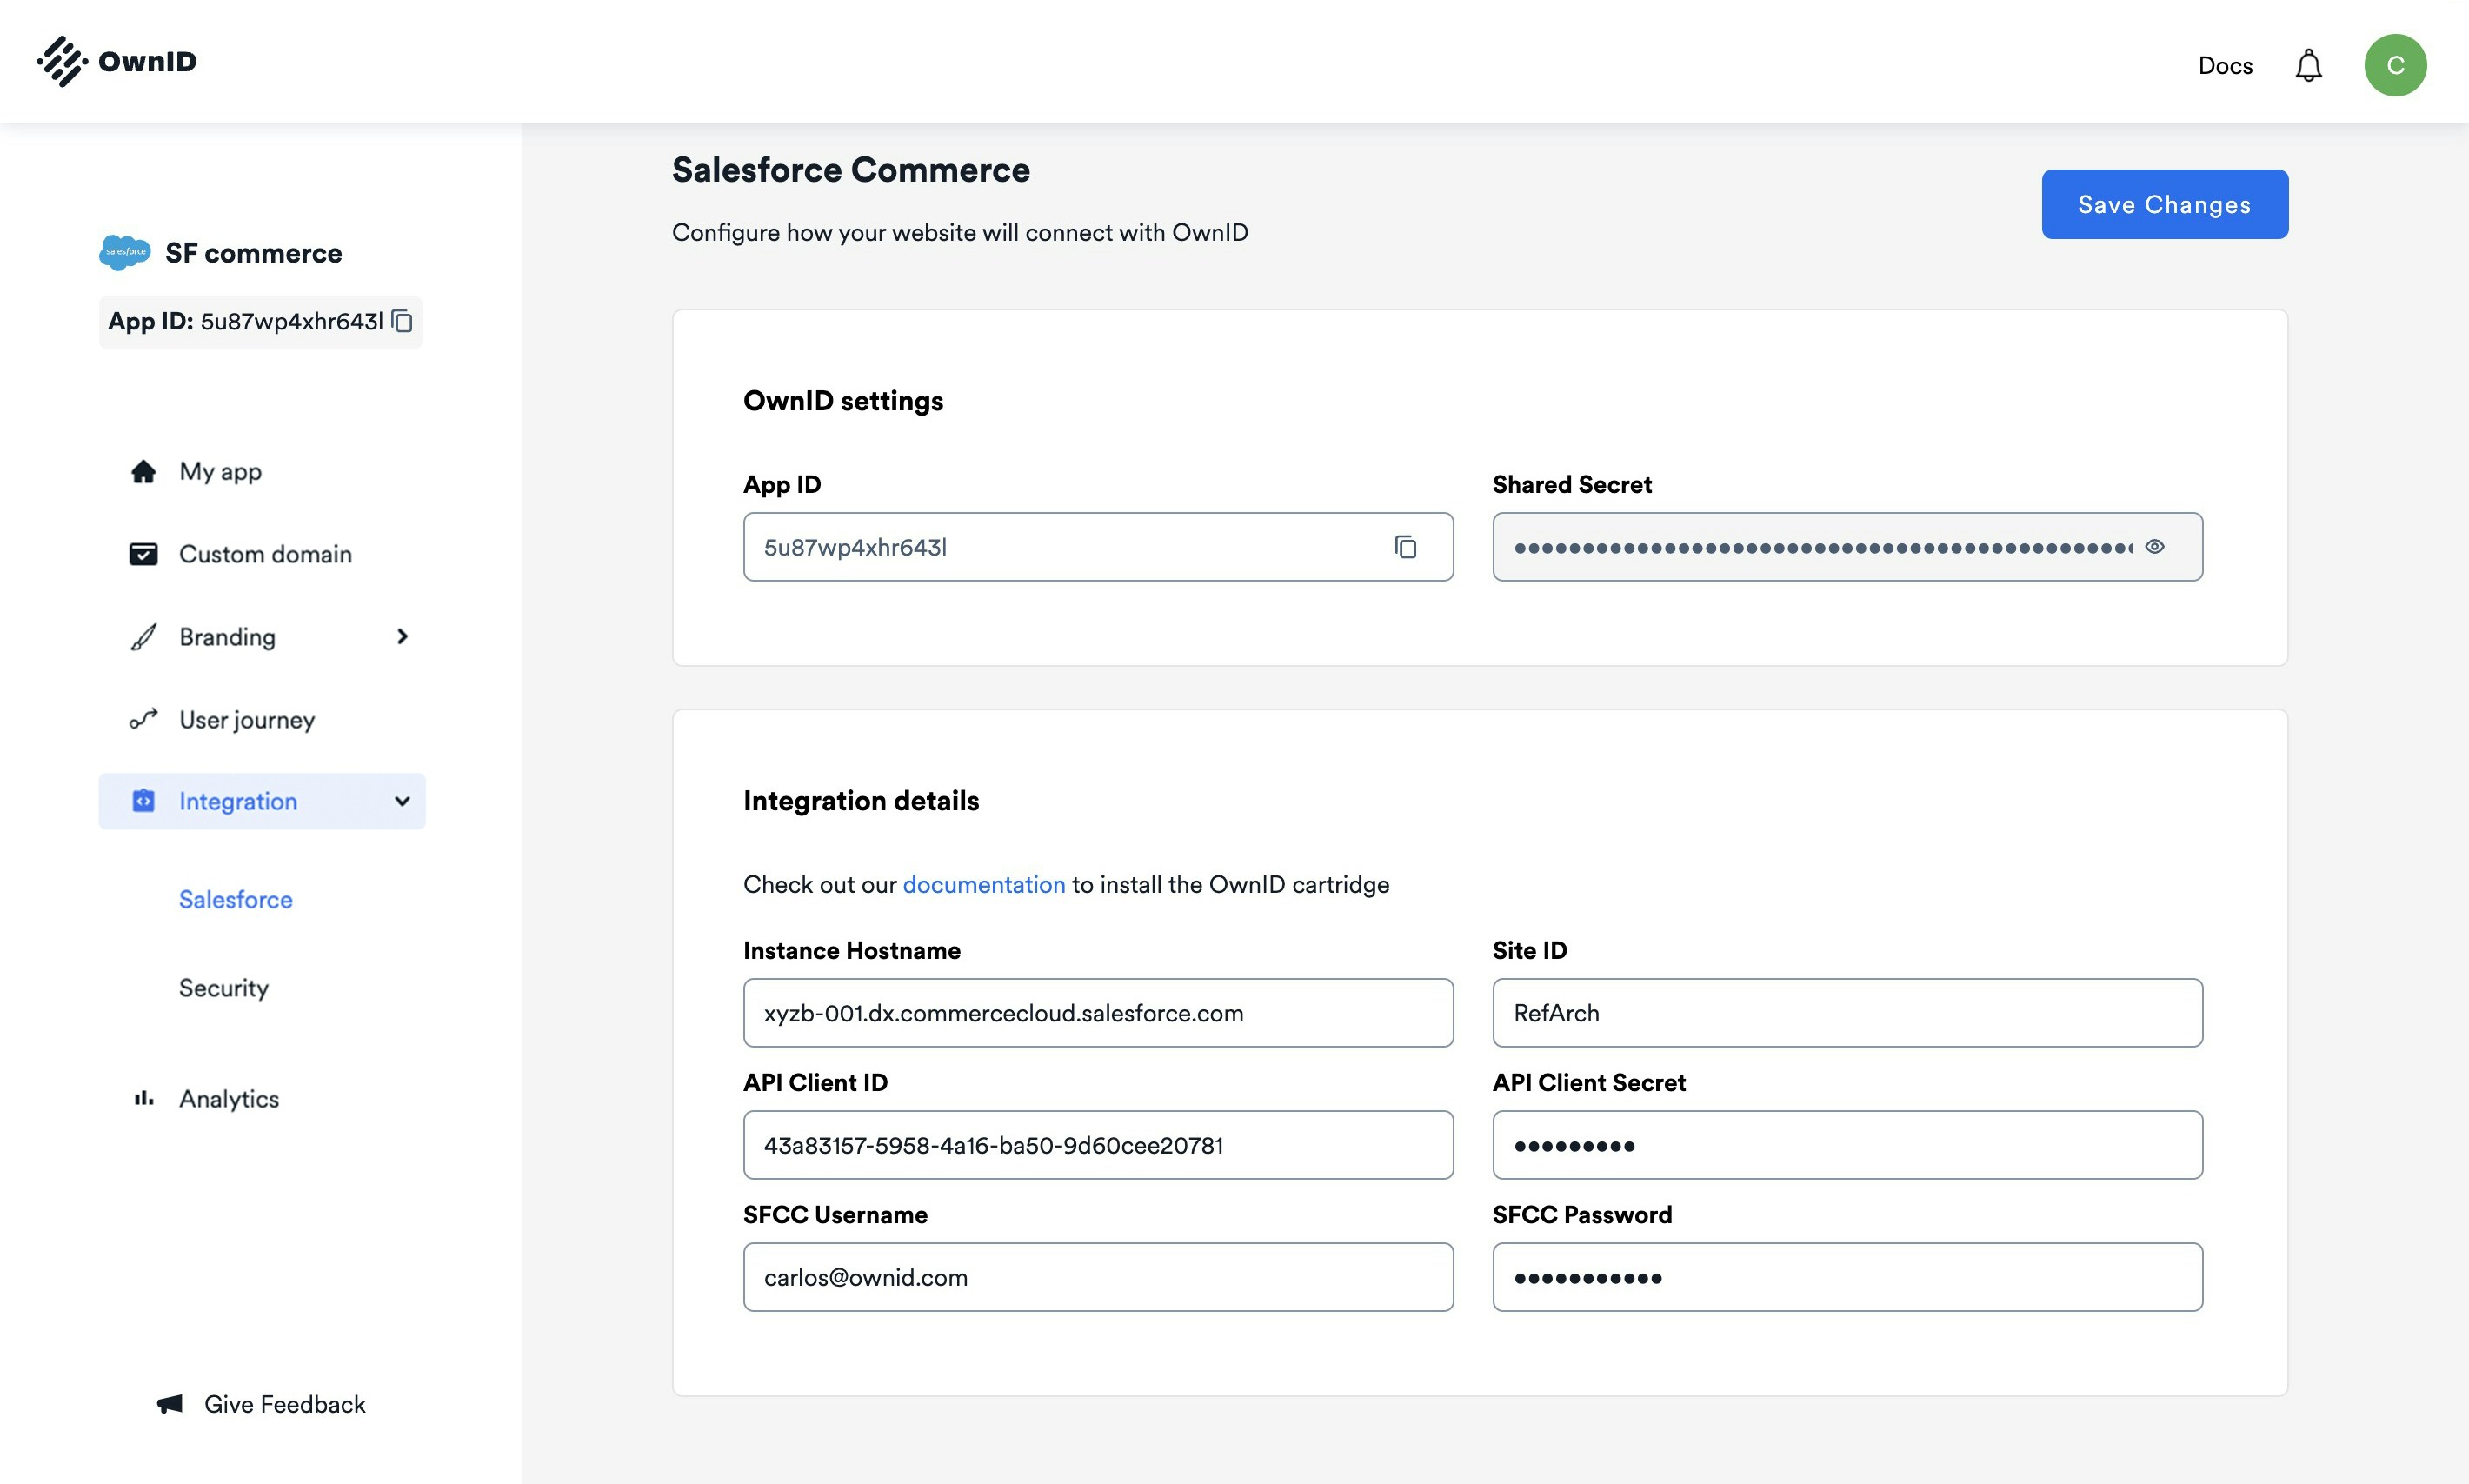 Figure 4. OwnID Console
Copy the `appId` so you can use it in the next step.
### Security Configuration
1. Go to *Integration > Security*
2. On the *Signing Key* panel, click **Generate a new key**
3. Save this key so you can use it in the next step.
Figure 4. OwnID Console
Copy the `appId` so you can use it in the next step.
### Security Configuration
1. Go to *Integration > Security*
2. On the *Signing Key* panel, click **Generate a new key**
3. Save this key so you can use it in the next step.
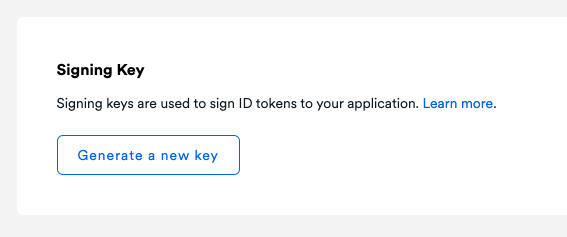 Figure 5. Signing Key
## Step 3 - Install the SFCC Cartridge
1. Upload and add the cartridge to the target site.
2. Navigate to *Merchant Tools > Site Preferences > Custom Preferences > OwnID* and set the following preferences:
3. Set `EnableOwnId` to `true` to display the OwnID widget.
4. `Env` Select the OwnID production environment.
5. Enter the `AppId` previously copied from the OwnID Console.
6. Enter the `Signing Key` previously copied from the OwnID Console.
Figure 5. Signing Key
## Step 3 - Install the SFCC Cartridge
1. Upload and add the cartridge to the target site.
2. Navigate to *Merchant Tools > Site Preferences > Custom Preferences > OwnID* and set the following preferences:
3. Set `EnableOwnId` to `true` to display the OwnID widget.
4. `Env` Select the OwnID production environment.
5. Enter the `AppId` previously copied from the OwnID Console.
6. Enter the `Signing Key` previously copied from the OwnID Console.
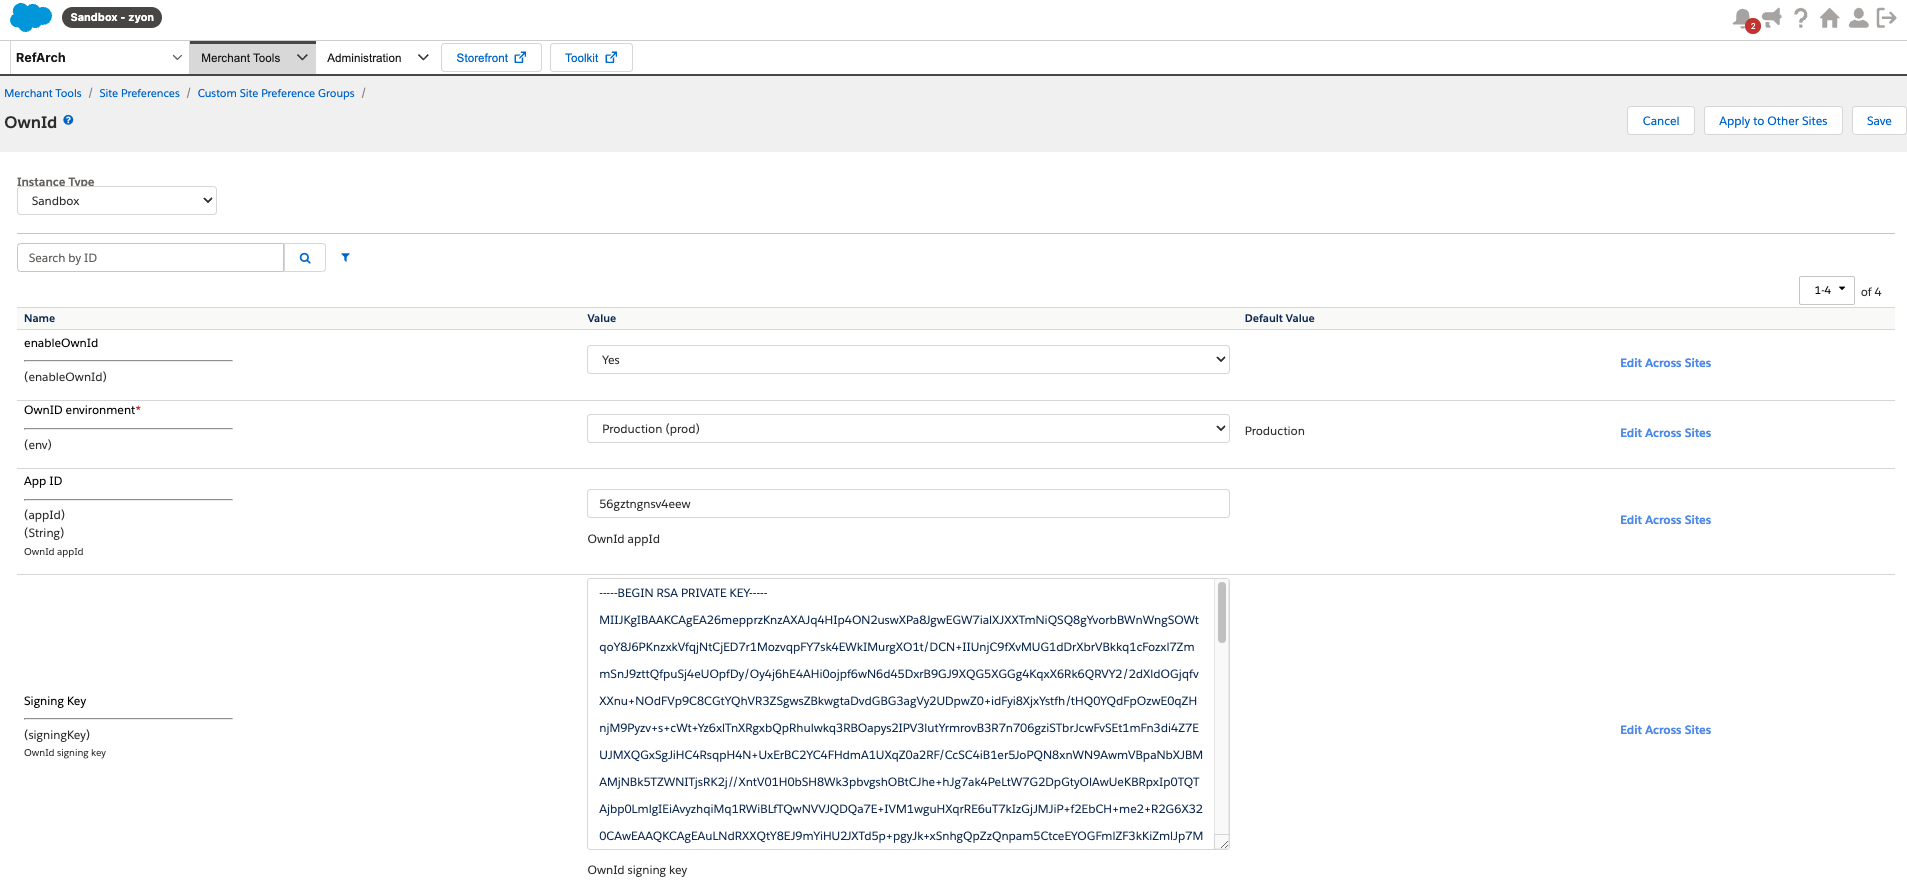 Figure 6. OwnID Cartridge Configuration
## Step 4 - Add OwnID SDK script to your template
After the cartridge is installed, you need to add this script to a template that is rendered in all pages, such as `templates/default/common/htmlHead.isml`
**Make sure the script is added to all the pages of your website**
```javascript theme={null}
Include the OwnId SDK
```
## Advanced Configuration
### Styling Options
#### Default Button (Side-by-side)
Figure 6. OwnID Cartridge Configuration
## Step 4 - Add OwnID SDK script to your template
After the cartridge is installed, you need to add this script to a template that is rendered in all pages, such as `templates/default/common/htmlHead.isml`
**Make sure the script is added to all the pages of your website**
```javascript theme={null}
Include the OwnId SDK
```
## Advanced Configuration
### Styling Options
#### Default Button (Side-by-side)
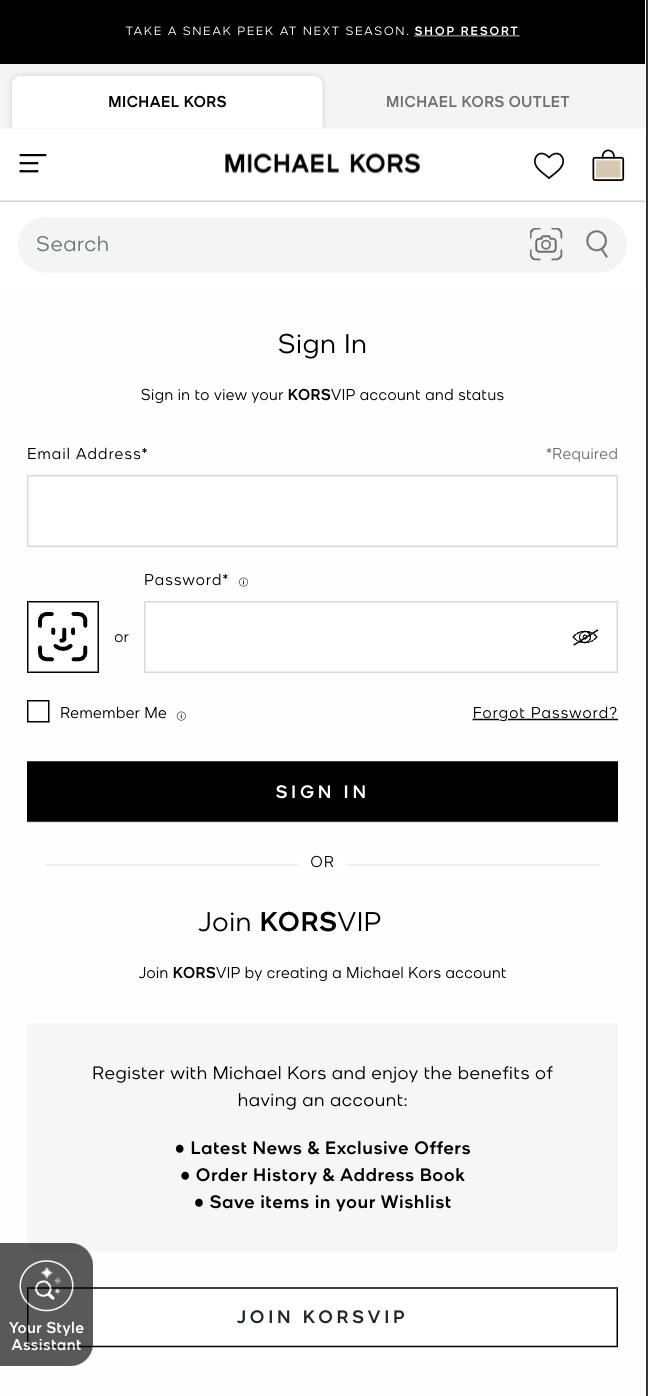 Default button variant (Example for michaelkors.com)
The default implementation places the OwnID button side by side with the password field and requires no additional configuration in the cartridge.
If you would like to style this button, you can utilize the following CSS variables:
```css theme={null}
ownid-fingerprint-button-widget {
--ownid-button-widget-border-radius;
--ownid-button-widget-font-size;
--ownid-button-widget-color;
--ownid-button-widget-border-color;
--ownid-button-widget-check-size;
--ownid-button-widget-check-position-top;
--ownid-button-widget-check-position-right;
z-index;
}
```
#### Standalone Button
The OwnID SFCC cartridge doesn't render automatically this variant.
If you want to use it make sure you enable the configuration option `skipDefaultWidgets`, so there's no overlap with the default (side-by-side) variant.
Default button variant (Example for michaelkors.com)
The default implementation places the OwnID button side by side with the password field and requires no additional configuration in the cartridge.
If you would like to style this button, you can utilize the following CSS variables:
```css theme={null}
ownid-fingerprint-button-widget {
--ownid-button-widget-border-radius;
--ownid-button-widget-font-size;
--ownid-button-widget-color;
--ownid-button-widget-border-color;
--ownid-button-widget-check-size;
--ownid-button-widget-check-position-top;
--ownid-button-widget-check-position-right;
z-index;
}
```
#### Standalone Button
The OwnID SFCC cartridge doesn't render automatically this variant.
If you want to use it make sure you enable the configuration option `skipDefaultWidgets`, so there's no overlap with the default (side-by-side) variant.
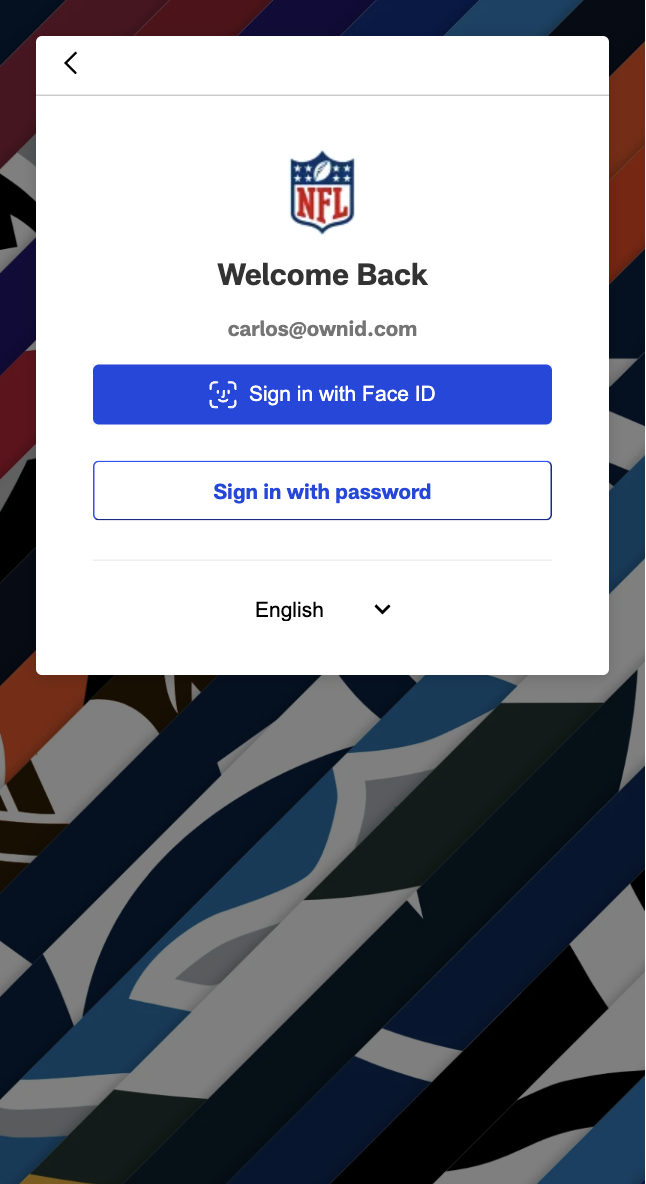 Standalone button (Example for nfl.com)
If you want to position the OwnID button independently from the password field, you can use the `standalone-button` variant.
Use the examples below to render the button in your **login**, **register** or **account recovery** pages:
```javascript Login theme={null}
ownid('login', {
variant: 'standalone-button',
infoTooltip: false,
loginIdField: document.querySelector('#email'),
element: document.querySelector('.wrapper-div'),
onLogin: (data) => window.ownidOnLogin(data)
});
```
```javascript Login w/ redirection theme={null}
ownid('login', {
variant: 'standalone-button',
infoTooltip: false,
loginIdField: document.querySelector('#email'),
element: document.querySelector('.wrapper-div'),
onLogin: (data) => window.ownidOnLogin(data, {
performRedirect: true,
redirectUrl: "your-custom-url"
})
});
```
```javascript Register theme={null}
ownid('register', {
variant: 'standalone-button',
infoTooltip: false,
loginIdField: document.querySelector('#email'),
passwordField: document.querySelector('#password'),
passwordFieldBinding: false, // false by default (if true, OwnID creates a random strong password)
confirmPasswordContainer: document.querySelector('#confirm-password'), // If you have a confirm password field
element: document.querySelector('.wrapper-div'),
onRegister: window.ownidOnRegister,
onLogin: (data) => window.ownidOnLogin(data)
});
```
```javascript Account Recovery theme={null}
ownid('recover', {
variant: 'standalone-button',
infoTooltip: false,
loginIdField: document.querySelector('#email'),
element: document.querySelector('.wrapper-div'),
onLogin: (data) => window.ownidOnLogin(data)
});
```
Note: in the code sample above, `wrapper-div` represents the div where the button will be shown. Configure your own.
If you would like to style this button, you can utilize the following CSS variables:
```css theme={null}
ownid-standalone-button-widget {
height: 40px;
--ownid-button-width: 100%;
width: 100%;
--ownid-button-widget-border-color;
--ownid-button-widget-border-radius;
--ownid-button-widget-font-size;
--ownid-button-widget-font-weight;
--ownid-button-widget-color;
--ownid-button-widget-icon-height;
--ownid-button-widget-icon-stroke-width;
--ownid-button-widget-check-size;
--ownid-button-widget-check-position-top;
--ownid-button-widget-check-position-right;
}
```
```css theme={null}
ownid-standalone-button-widget[finished=true] {
--ownid-button-widget-border-color;
--ownid-button-widget-color;
--ownid-button-widget-check-color;
}
```
### Cartridge Settings
This section outlines the preferences that can be configured for the OwnID SFCC cartridge.
Standalone button (Example for nfl.com)
If you want to position the OwnID button independently from the password field, you can use the `standalone-button` variant.
Use the examples below to render the button in your **login**, **register** or **account recovery** pages:
```javascript Login theme={null}
ownid('login', {
variant: 'standalone-button',
infoTooltip: false,
loginIdField: document.querySelector('#email'),
element: document.querySelector('.wrapper-div'),
onLogin: (data) => window.ownidOnLogin(data)
});
```
```javascript Login w/ redirection theme={null}
ownid('login', {
variant: 'standalone-button',
infoTooltip: false,
loginIdField: document.querySelector('#email'),
element: document.querySelector('.wrapper-div'),
onLogin: (data) => window.ownidOnLogin(data, {
performRedirect: true,
redirectUrl: "your-custom-url"
})
});
```
```javascript Register theme={null}
ownid('register', {
variant: 'standalone-button',
infoTooltip: false,
loginIdField: document.querySelector('#email'),
passwordField: document.querySelector('#password'),
passwordFieldBinding: false, // false by default (if true, OwnID creates a random strong password)
confirmPasswordContainer: document.querySelector('#confirm-password'), // If you have a confirm password field
element: document.querySelector('.wrapper-div'),
onRegister: window.ownidOnRegister,
onLogin: (data) => window.ownidOnLogin(data)
});
```
```javascript Account Recovery theme={null}
ownid('recover', {
variant: 'standalone-button',
infoTooltip: false,
loginIdField: document.querySelector('#email'),
element: document.querySelector('.wrapper-div'),
onLogin: (data) => window.ownidOnLogin(data)
});
```
Note: in the code sample above, `wrapper-div` represents the div where the button will be shown. Configure your own.
If you would like to style this button, you can utilize the following CSS variables:
```css theme={null}
ownid-standalone-button-widget {
height: 40px;
--ownid-button-width: 100%;
width: 100%;
--ownid-button-widget-border-color;
--ownid-button-widget-border-radius;
--ownid-button-widget-font-size;
--ownid-button-widget-font-weight;
--ownid-button-widget-color;
--ownid-button-widget-icon-height;
--ownid-button-widget-icon-stroke-width;
--ownid-button-widget-check-size;
--ownid-button-widget-check-position-top;
--ownid-button-widget-check-position-right;
}
```
```css theme={null}
ownid-standalone-button-widget[finished=true] {
--ownid-button-widget-border-color;
--ownid-button-widget-color;
--ownid-button-widget-check-color;
}
```
### Cartridge Settings
This section outlines the preferences that can be configured for the OwnID SFCC cartridge.
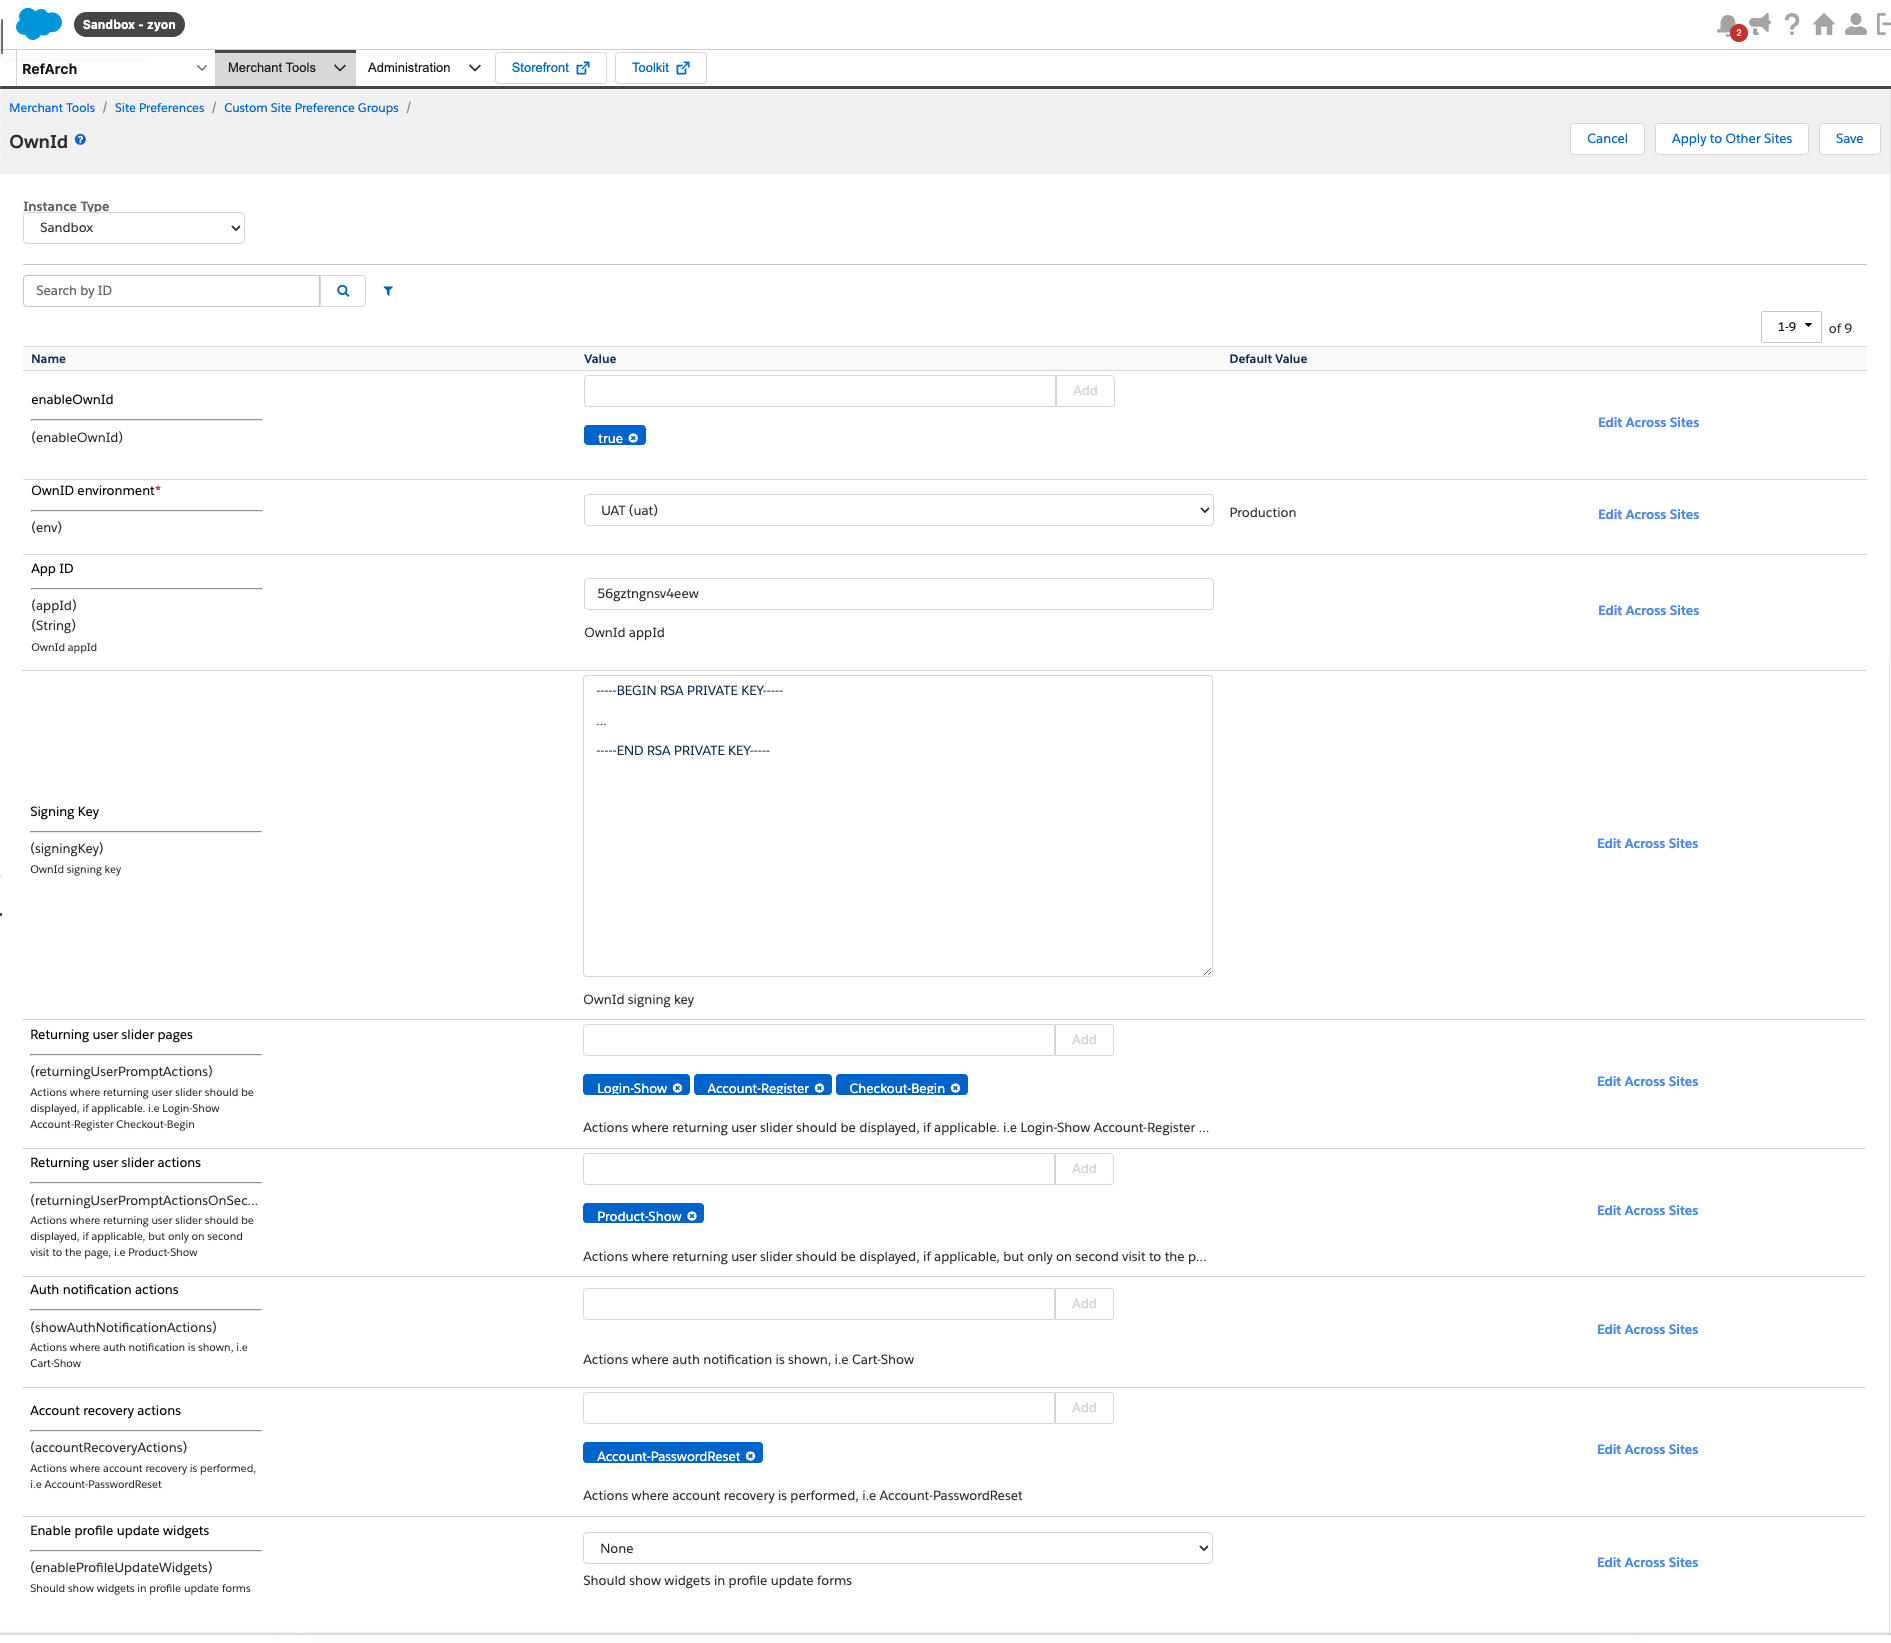 **`enableOwnId`**
* **Type**: Multi-value
* **Description**: Enables OwnID functionality on specified sites.
* **Values**:
* `"true"` or `"all"`: Enables OwnID on all sites.
* List of locales (e.g., `"en-US", "en-GB"`): Enables OwnID only on specified sites.
**`env`**
* **Type**: String
* **Description**: Sets the environment for OwnID usage (e.g., `UAT`, `Production`).
**`appId`**
* **Type**: String
* **Description**: Specifies the OwnID App ID used for integration.
**`signingKey`**
* **Type**: String
* **Description**: Private key retrieved from the OwnID console for secure communication.
**`skipDefaultWidgets`**
* **Type**: Boolean
* **Description**: Should the cartridge skip rendering default OwnID widgets automatically.
**`returningUserPromptActions`**
* **Type**: List
* **Description**: Specifies the action pages on which to prompt the Returning User Prompt (RUP), if applicable.
* Example: `Login-Show`, `Account-Register`, `Checkout-Begin`
**`returningUserPromptActionsOnSecondVisit`**
* **Type**: List
* **Description**: Specifies the action pages on which to prompt the Returning User Prompt (RUP), but only on a second visit to any page on the list.
**`showAuthNotificationActions`**
* **Type**: List
* **Description**: Specifies the action pages on which to show an authentication notification.
* Example: `Cart-Show`
**`accountRecoveryActions`**
* **Type**: List
* **Description**: Specifies the action pages on which to prompt for account recovery actions.
* Example: `Account-PasswordReset`
**`enableProfileUpdateWidgets`**
* **Type**: Boolean
* **Description**: Displays a passwordless widget on account update forms (e.g., email or password update).
All prompts will only be shown if they are applicable based on conditions such as user context (e.g., mobile usage, returning user status).
***
## Next Steps
### Ready to deploy?
Take me to the Deployment Checklist
**`enableOwnId`**
* **Type**: Multi-value
* **Description**: Enables OwnID functionality on specified sites.
* **Values**:
* `"true"` or `"all"`: Enables OwnID on all sites.
* List of locales (e.g., `"en-US", "en-GB"`): Enables OwnID only on specified sites.
**`env`**
* **Type**: String
* **Description**: Sets the environment for OwnID usage (e.g., `UAT`, `Production`).
**`appId`**
* **Type**: String
* **Description**: Specifies the OwnID App ID used for integration.
**`signingKey`**
* **Type**: String
* **Description**: Private key retrieved from the OwnID console for secure communication.
**`skipDefaultWidgets`**
* **Type**: Boolean
* **Description**: Should the cartridge skip rendering default OwnID widgets automatically.
**`returningUserPromptActions`**
* **Type**: List
* **Description**: Specifies the action pages on which to prompt the Returning User Prompt (RUP), if applicable.
* Example: `Login-Show`, `Account-Register`, `Checkout-Begin`
**`returningUserPromptActionsOnSecondVisit`**
* **Type**: List
* **Description**: Specifies the action pages on which to prompt the Returning User Prompt (RUP), but only on a second visit to any page on the list.
**`showAuthNotificationActions`**
* **Type**: List
* **Description**: Specifies the action pages on which to show an authentication notification.
* Example: `Cart-Show`
**`accountRecoveryActions`**
* **Type**: List
* **Description**: Specifies the action pages on which to prompt for account recovery actions.
* Example: `Account-PasswordReset`
**`enableProfileUpdateWidgets`**
* **Type**: Boolean
* **Description**: Displays a passwordless widget on account update forms (e.g., email or password update).
All prompts will only be shown if they are applicable based on conditions such as user context (e.g., mobile usage, returning user status).
***
## Next Steps
### Ready to deploy?
Take me to the Deployment Checklist