> ## Documentation Index
> Fetch the complete documentation index at: https://docs.ownid.com/llms.txt
> Use this file to discover all available pages before exploring further.
# Salesforce Commerce (PWA)
> Integrate OwnID into Salesforce Composable Storefront (PWA).
Make sure to first configure a [Salesforce Commerce Cloud (SFCC)](/integrations/salesforce-commerce-cloud) integration, which is a precondition for this integration.
## How it works
OwnID integrates with the SFCC built-in API client, using our native SFCC Connector.
Integrate OwnID with your PWA by completing these four basic steps:
**Step 1** - Configure OIDC in OwnID Console.
**Step 2** - Configure SLAS IDP.
**Step 3** - Configure SFCC permissions.
**Step 4** - Configure OwnID UI in your app.
## Prerequisites
* Complete the [Salesforce Commerce Cloud (SFCC)](/integrations/salesforce-commerce-cloud) integration.
* Have permissions to access and modify SFCC SLAS Admin UI.
* Get a hold of your SFCC instance's shortcode. It is available from the Business Manager SFCC dashboard, under `Administration > Site Development > Salesforce Commerce API Settings`. Its value is typically `kv7kzm78`.
## Step 1 - Configure OIDC in OwnID Console
1. Open the Salesforce integration page in the OwnID Console.
2. Scroll down to the *OpenID Connect settings* section.
3. Copy the *Client ID* and *Client Secret* values. We will use them in the next step.
4. In the *Redirect URIs* field, add the value
```
https://{shortcode}.api.commercecloud.salesforce.com/shopper/auth/v1/idp/callback/default-ownid
```
Where `{shortcode}` is your SFCC instance's shortcode. The name `default-ownid` is the default IDP name. If you have wish to setup a different IDP name, use that instead.
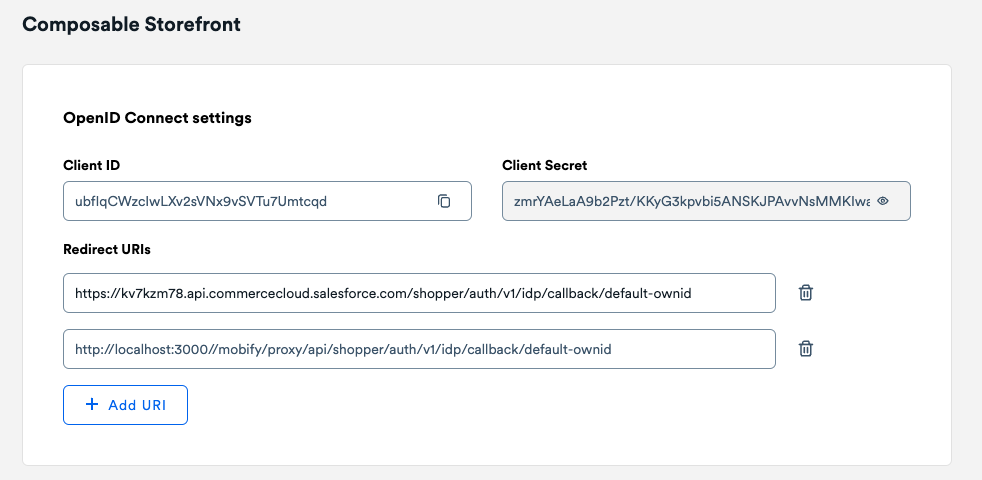 Figure 1. OpenID Connect settings
5. Copy the endpoints listed in the *Endpoints* section. We will use them in the next step.
Figure 1. OpenID Connect settings
5. Copy the endpoints listed in the *Endpoints* section. We will use them in the next step.
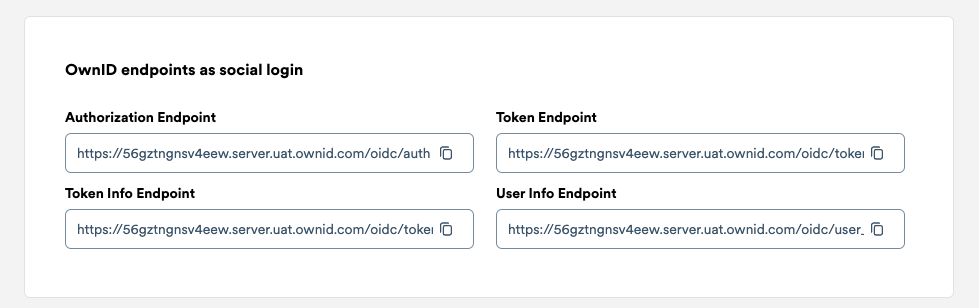 Figure 2. OpenID endpoints
## Step 2 - Configure SLAS IDP
1. Open the SFCC SLAS Admin UI, accessible at `https://{shortcode}.api.commercecloud.salesforce.com`.
2. In the *Clients* tab, edit the redirect URI of the clients you are using in your PWA. Add the endpoint `/idp-callback` for all relevant domains. Keep the `/callback` in place. You can use a different endpoint if you wish, we will configure its value in the PWA in the next step. Just make sure to create a different endpoint than `/callback`, because this one is used by other authentication flows of SLAS.
Value for example:
```
http://127.0.0.1:3000/callback|http://localhost:3000/callback|https://*.mobify-storefront.com/callback|http://127.0.0.1:3000/idp-callback|http://localhost:3000/idp-callback|https://*.mobify-storefront.com/idp-callback
```
Figure 2. OpenID endpoints
## Step 2 - Configure SLAS IDP
1. Open the SFCC SLAS Admin UI, accessible at `https://{shortcode}.api.commercecloud.salesforce.com`.
2. In the *Clients* tab, edit the redirect URI of the clients you are using in your PWA. Add the endpoint `/idp-callback` for all relevant domains. Keep the `/callback` in place. You can use a different endpoint if you wish, we will configure its value in the PWA in the next step. Just make sure to create a different endpoint than `/callback`, because this one is used by other authentication flows of SLAS.
Value for example:
```
http://127.0.0.1:3000/callback|http://localhost:3000/callback|https://*.mobify-storefront.com/callback|http://127.0.0.1:3000/idp-callback|http://localhost:3000/idp-callback|https://*.mobify-storefront.com/idp-callback
```
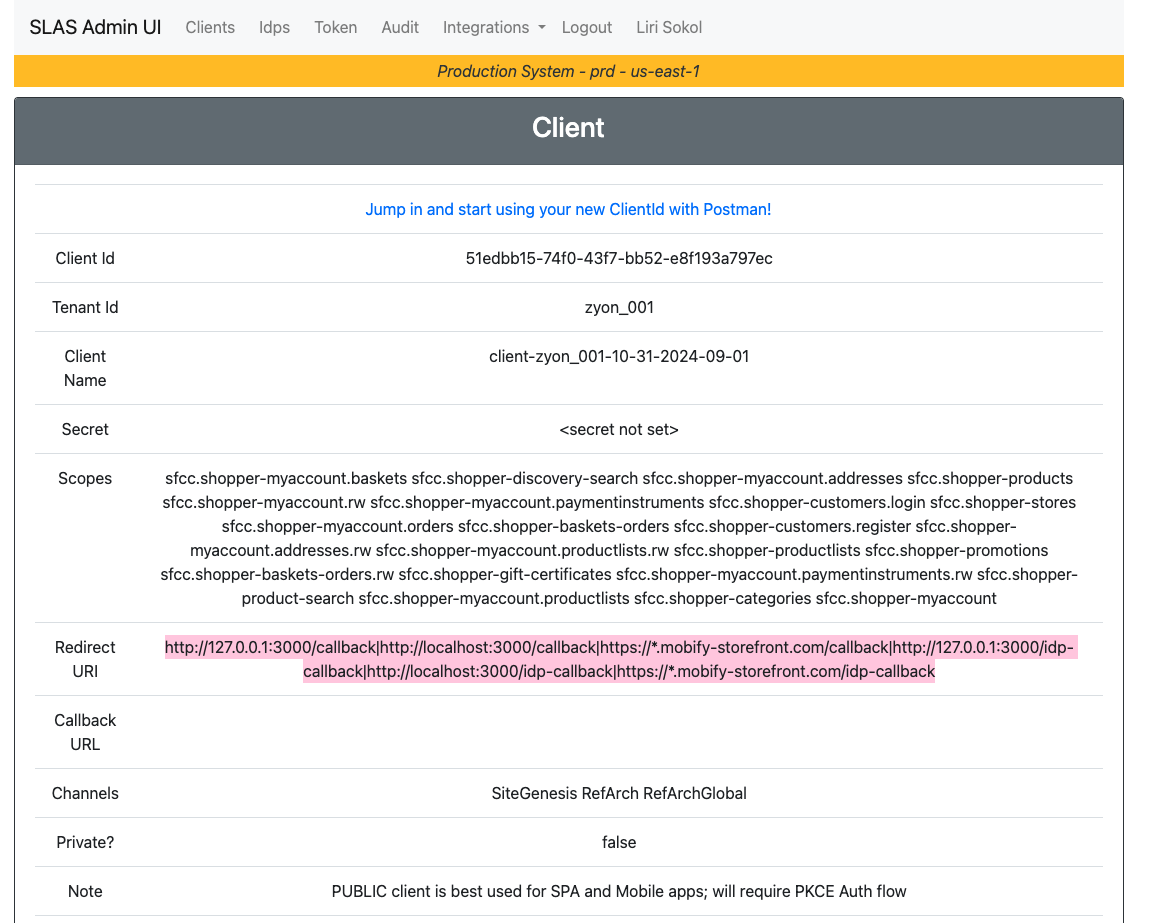 Figure 3. SLAS Admin UI: Client
3. Go to the *Idps* tab and click the *Add Idp* button.
Figure 3. SLAS Admin UI: Client
3. Go to the *Idps* tab and click the *Add Idp* button.
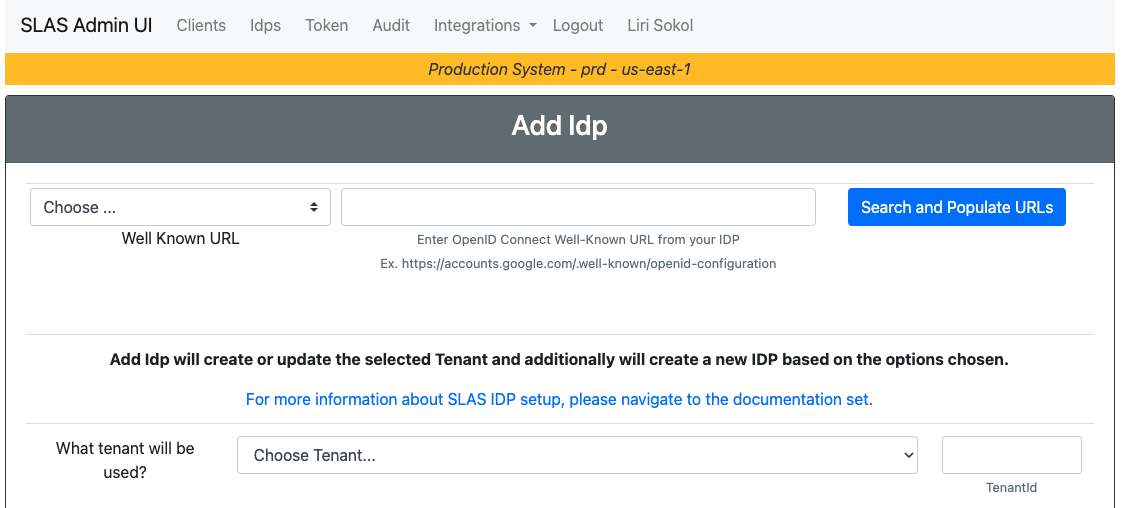 Figure 3. SLAS Admin UI: Add Idp
4. Fill in the form with the following values:
* `What tenant will be used?` - Choose your tenant.
* `Idp Name` - Enter `default-ownid` or the name you used in the OwnID Console.
* `Idp Client Id` - Enter the *Client ID* from the OwnID Console.
* `Secret` - Enter the *Client Secret* from the OwnID Console.
* `Scopes` - Enter `openid profile email`.
* `Redirect URL` - Enter `https://{shortcode}.api.commercecloud.salesforce.com/shopper/auth/v1/idp/callback/default-ownid`, the value you had set in the Redirect URIs field in the OwnID Console.
* `Auth URL` - Enter the *Authorization Endpoint* from the OwnID Console.
* `Token URL` - Enter the *Token Endpoint* from the OwnID Console.
* `Token Info URL` - Enter the *Token Info Endpoint* from the OwnID Console.
* `User Info URL` - Enter the *User Info Endpoint* from the OwnID Console.
* `Well Known URL` - Leave empty.
* `Client Credentials in POST body?` - check the checkbox.
* `Default IDP Claim Map` - Leave empty.
* `Login Merge Claims` - Enter the value `email`.
* `Team Id` - Leave empty.
* `Key Id` - Leave empty.
1. Click *Submit*.
2. Go back to the client you are using and copy the *Client Id*, we will use it in the next step.
## Step 3 - Configure SFCC permissions
1. Open the SFCC Business Manager.
2. Go to *Administration > Site Development > Open Commerce API Settings*.
3. Add the following JSON object to the *shop* tab:
```json shop tab theme={null}
...
{
"client_id": "Client ID",
"resources": [
{
"resource_id": "/customers/*",
"methods": [
"get", "patch"
],
"read_attributes": "(**)",
"write_attributes": "(**)"
}
]
},
...
```
Replace `Client ID` with the *Client Id* from the SLAS Admin UI.
## Step 4 - Configure OwnID UI in your app
1. Open your PWA project in your IDE. First install the OwnID React SDK:
```curl npm react theme={null}
npm install @ownid/react
```
It is recommended to review the general [OwnID Frontend Flows](/building-blocks/boost/build-login) documentation to understand the SDK's capabilities.
2. Edit `ssr.js` (typically at `overrides/app/ssr.js`) and add `'*.ownid.com'` to both `script-src` and `connect-src` CSP headers.
3. Import and configure the OwnIDInit component. Make sure to include so that it is rendered either on every page or on every page relevant to authentication flows.
In the the `appId` field, use the app ID from the OwnID Console.
In the `idpName` field, use the name you used in the SLAS IDP configuration, by default it is `default-ownid`.
In the `callbackEndpoint` field, use the endpoint you configured in the SLAS client redirect URI. We recommend on `/idp-callback`.
```jsx OwnIDInit theme={null}
import React from 'react'
import {OwnIDInit} from '@ownid/react'
import {useCommerceApi} from '@salesforce/commerce-sdk-react'
// ...
const apiClient = useCommerceApi()
const {
parameters: {clientId, siteId, organizationId},
proxy
} = apiClient.shopperLogin.clientConfig
// ...
// ...
```
4. Customize the login form to include the OwnID widget. By default you would need to override `app/components/forms/login-fields.jsx`.
```jsx overrides/app/components/forms/login-fields.jsx theme={null}
import React, {useRef} from 'react'
import PropTypes from 'prop-types'
import {Stack} from '@salesforce/retail-react-app/app/components/shared/ui'
import useLoginFields from '@salesforce/retail-react-app/app/components/forms/useLoginFields'
import Field from '@salesforce/retail-react-app/app/components/field'
import {OwnID, WidgetType} from '@ownid/react'
const LoginFields = ({form, prefix = ''}) => {
const fields = useLoginFields({form, prefix})
const emailRef = useRef(null)
const passwordRef = useRef(null)
return (
/>
console.error(error)}
/>
)
}
LoginFields.propTypes = {
form: PropTypes.object.isRequired,
prefix: PropTypes.string
}
export default LoginFields
```
5. Customize the registration form to include the OwnID widget. By default you would need to override `app/components/forms/registration-fields.jsx`.
```jsx overrides/app/components/forms/registration-fields.jsx theme={null}
import React, {useEffect, useRef} from 'react'
import PropTypes from 'prop-types'
import {Stack} from '@salesforce/retail-react-app/app/components/shared/ui'
import useRegistrationFields from '@salesforce/retail-react-app/app/components/forms/useRegistrationFields'
import Field from '@salesforce/retail-react-app/app/components/field'
import PasswordRequirements from '@salesforce/retail-react-app/app/components/forms/password-requirements'
import {OwnID, WidgetType} from '@ownid/react'
const RegistrationFields = ({form, prefix = ''}) => {
const fields = useRegistrationFields({form, prefix})
const password = form.watch('password')
const emailRef = useRef(null)
const passwordRef = useRef(null)
const passwordRequirementsRef = useRef(null)
return (
console.error(error)}
/>
)
}
RegistrationFields.propTypes = {
form: PropTypes.object.isRequired,
prefix: PropTypes.string
}
export default RegistrationFields
```
6. Add a new dedicated page to handle the OAuth callback. This is the route that we will map to `/idp-callback`.
Typically, it would be at `pages/idp-callback/index.jsx`.
The UI in the snippet is only a recommendation, you can customize it to fit your needs.
The important bits are the call to `window.ownid.completeAuthorizeFlow` and the handling of the `usid` and `code` query parameters.
In addition, make sure to handle an already authenticated user in already to avoid a redirect loop. This is done in the snippet using the `useCurrentCustomer` hook.
```jsx overrides/app/pages/idp-callback/index.jsx theme={null}
import React, {useEffect, useState} from 'react'
import {useCurrentCustomer} from '@salesforce/retail-react-app/app/hooks/use-current-customer'
import useNavigation from '@salesforce/retail-react-app/app/hooks/use-navigation'
import {useLocation} from 'react-router-dom'
import {useSearchParams} from '@salesforce/retail-react-app/app/hooks/use-search-params'
import useAuthContext from '@salesforce/commerce-sdk-react/hooks/useAuthContext'
const IDPCallback = () => {
const navigate = useNavigation()
const location = useLocation()
const [{usid, code}] = useSearchParams()
const {data: customer} = useCurrentCustomer()
const [authenticationError, setAuthenticationError] = useState()
const auth = useAuthContext()
useEffect(() => {
if (customer?.isRegistered) {
if (location?.state?.directedFrom) {
navigate(location.state.directedFrom)
} else {
navigate('/account')
}
return
}
if (!usid || !code) {
setAuthenticationError('Invalid query parameters state')
return
}
setTimeout(() => {
auth.queueRequest(() => window.ownid.completeAuthorizeFlow(usid, code), false)
.catch(
(error) => setAuthenticationError(error.message)
)
}, 500)
}, [customer?.isRegistered])
return (
<>
Figure 3. SLAS Admin UI: Add Idp
4. Fill in the form with the following values:
* `What tenant will be used?` - Choose your tenant.
* `Idp Name` - Enter `default-ownid` or the name you used in the OwnID Console.
* `Idp Client Id` - Enter the *Client ID* from the OwnID Console.
* `Secret` - Enter the *Client Secret* from the OwnID Console.
* `Scopes` - Enter `openid profile email`.
* `Redirect URL` - Enter `https://{shortcode}.api.commercecloud.salesforce.com/shopper/auth/v1/idp/callback/default-ownid`, the value you had set in the Redirect URIs field in the OwnID Console.
* `Auth URL` - Enter the *Authorization Endpoint* from the OwnID Console.
* `Token URL` - Enter the *Token Endpoint* from the OwnID Console.
* `Token Info URL` - Enter the *Token Info Endpoint* from the OwnID Console.
* `User Info URL` - Enter the *User Info Endpoint* from the OwnID Console.
* `Well Known URL` - Leave empty.
* `Client Credentials in POST body?` - check the checkbox.
* `Default IDP Claim Map` - Leave empty.
* `Login Merge Claims` - Enter the value `email`.
* `Team Id` - Leave empty.
* `Key Id` - Leave empty.
1. Click *Submit*.
2. Go back to the client you are using and copy the *Client Id*, we will use it in the next step.
## Step 3 - Configure SFCC permissions
1. Open the SFCC Business Manager.
2. Go to *Administration > Site Development > Open Commerce API Settings*.
3. Add the following JSON object to the *shop* tab:
```json shop tab theme={null}
...
{
"client_id": "Client ID",
"resources": [
{
"resource_id": "/customers/*",
"methods": [
"get", "patch"
],
"read_attributes": "(**)",
"write_attributes": "(**)"
}
]
},
...
```
Replace `Client ID` with the *Client Id* from the SLAS Admin UI.
## Step 4 - Configure OwnID UI in your app
1. Open your PWA project in your IDE. First install the OwnID React SDK:
```curl npm react theme={null}
npm install @ownid/react
```
It is recommended to review the general [OwnID Frontend Flows](/building-blocks/boost/build-login) documentation to understand the SDK's capabilities.
2. Edit `ssr.js` (typically at `overrides/app/ssr.js`) and add `'*.ownid.com'` to both `script-src` and `connect-src` CSP headers.
3. Import and configure the OwnIDInit component. Make sure to include so that it is rendered either on every page or on every page relevant to authentication flows.
In the the `appId` field, use the app ID from the OwnID Console.
In the `idpName` field, use the name you used in the SLAS IDP configuration, by default it is `default-ownid`.
In the `callbackEndpoint` field, use the endpoint you configured in the SLAS client redirect URI. We recommend on `/idp-callback`.
```jsx OwnIDInit theme={null}
import React from 'react'
import {OwnIDInit} from '@ownid/react'
import {useCommerceApi} from '@salesforce/commerce-sdk-react'
// ...
const apiClient = useCommerceApi()
const {
parameters: {clientId, siteId, organizationId},
proxy
} = apiClient.shopperLogin.clientConfig
// ...
// ...
```
4. Customize the login form to include the OwnID widget. By default you would need to override `app/components/forms/login-fields.jsx`.
```jsx overrides/app/components/forms/login-fields.jsx theme={null}
import React, {useRef} from 'react'
import PropTypes from 'prop-types'
import {Stack} from '@salesforce/retail-react-app/app/components/shared/ui'
import useLoginFields from '@salesforce/retail-react-app/app/components/forms/useLoginFields'
import Field from '@salesforce/retail-react-app/app/components/field'
import {OwnID, WidgetType} from '@ownid/react'
const LoginFields = ({form, prefix = ''}) => {
const fields = useLoginFields({form, prefix})
const emailRef = useRef(null)
const passwordRef = useRef(null)
return (
/>
console.error(error)}
/>
)
}
LoginFields.propTypes = {
form: PropTypes.object.isRequired,
prefix: PropTypes.string
}
export default LoginFields
```
5. Customize the registration form to include the OwnID widget. By default you would need to override `app/components/forms/registration-fields.jsx`.
```jsx overrides/app/components/forms/registration-fields.jsx theme={null}
import React, {useEffect, useRef} from 'react'
import PropTypes from 'prop-types'
import {Stack} from '@salesforce/retail-react-app/app/components/shared/ui'
import useRegistrationFields from '@salesforce/retail-react-app/app/components/forms/useRegistrationFields'
import Field from '@salesforce/retail-react-app/app/components/field'
import PasswordRequirements from '@salesforce/retail-react-app/app/components/forms/password-requirements'
import {OwnID, WidgetType} from '@ownid/react'
const RegistrationFields = ({form, prefix = ''}) => {
const fields = useRegistrationFields({form, prefix})
const password = form.watch('password')
const emailRef = useRef(null)
const passwordRef = useRef(null)
const passwordRequirementsRef = useRef(null)
return (
console.error(error)}
/>
)
}
RegistrationFields.propTypes = {
form: PropTypes.object.isRequired,
prefix: PropTypes.string
}
export default RegistrationFields
```
6. Add a new dedicated page to handle the OAuth callback. This is the route that we will map to `/idp-callback`.
Typically, it would be at `pages/idp-callback/index.jsx`.
The UI in the snippet is only a recommendation, you can customize it to fit your needs.
The important bits are the call to `window.ownid.completeAuthorizeFlow` and the handling of the `usid` and `code` query parameters.
In addition, make sure to handle an already authenticated user in already to avoid a redirect loop. This is done in the snippet using the `useCurrentCustomer` hook.
```jsx overrides/app/pages/idp-callback/index.jsx theme={null}
import React, {useEffect, useState} from 'react'
import {useCurrentCustomer} from '@salesforce/retail-react-app/app/hooks/use-current-customer'
import useNavigation from '@salesforce/retail-react-app/app/hooks/use-navigation'
import {useLocation} from 'react-router-dom'
import {useSearchParams} from '@salesforce/retail-react-app/app/hooks/use-search-params'
import useAuthContext from '@salesforce/commerce-sdk-react/hooks/useAuthContext'
const IDPCallback = () => {
const navigate = useNavigation()
const location = useLocation()
const [{usid, code}] = useSearchParams()
const {data: customer} = useCurrentCustomer()
const [authenticationError, setAuthenticationError] = useState()
const auth = useAuthContext()
useEffect(() => {
if (customer?.isRegistered) {
if (location?.state?.directedFrom) {
navigate(location.state.directedFrom)
} else {
navigate('/account')
}
return
}
if (!usid || !code) {
setAuthenticationError('Invalid query parameters state')
return
}
setTimeout(() => {
auth.queueRequest(() => window.ownid.completeAuthorizeFlow(usid, code), false)
.catch(
(error) => setAuthenticationError(error.message)
)
}, 500)
}, [customer?.isRegistered])
return (
<>
Redirecting...
{authenticationError && Error: {authenticationError}
}
)
}
export default IDPCallback
```
7. Add a handler in your account page (typically `pages/account/index.jsx`) to handle post-registration flow.
```jsx overrides/app/pages/account/index.jsx theme={null}
import React, {useEffect} from 'react'
import {useAccessToken, useCustomerId} from '@salesforce/commerce-sdk-react'
const Account = () => {
const {token: accessToken} = useAccessToken()
const customerId = useCustomerId()
useEffect(() => {
if (!accessToken || !customerId) {
return
}
setTimeout(() => {
window.ownid.completeRegistrationFlow(accessToken, customerId)
}, 500)
}, [accessToken, customerId])
return (...)
}
export default Account
```