Your users see a URL that displays your brand such as
passwordless.your_domain.com instead of passwordless.ownid.com.
Add your custom domain
First, decide what subdomain to use: If your domain isexample.com, we recommend you use passwordless.example.com as your custom subdomain, but you can replace passwordless with whatever you like as long as it’s a valid subdomain.
After you decide on a subdomain, visit the OwnID Console > Custom Domain tab to start the domain connection process.
On the Custom Domain page, click Set up your own. You now see a form with an input to enter your desired subdomain. After entering your desired subdomain, a panel with instructions for setting up your DNS records will appear:

Step 1: Create a DNS record
Identify your DNS provider
To start, figure out what service is managing your DNS records, so you know exactly where to login and create the new records. If you already know your DNS provider, you can move on to the next section. Often, it’s the same place you registered your domain, but sometimes the DNS provider is different from your domain registrar. In case you are not sure, you can use a DNS Lookup tool and enter your domain. It might be able to tell you who your DNS provider is (but not always).Create required DNS records
These are standard instructions for creating your DNS records. If you have issues with any of the steps, please contact your DNS provider for more assistance: Sign into your DNS provider Most DNS providers have a control panel you can sign into to manage your DNS. Find your provider’s control panel page and sign in. Find the page to manage the DNS for your domain Now that you’re logged in, find where you can manage the DNS records for your domain in your provider’s control panel. If you’re having issues finding the right page, you can:- See if your DNS provider has a help article for adding new DNS records that can point you in the right direction.
- Contact your DNS provider for additional support.
Verify your CNAME record is setup
- Wait up to 10 minutes for your DNS provider to update its nameservers.
- Open the MXtoolbox Online Tool.
- Enter your custom domain name in the Domain Name field.
- Click MX Lookup to query for your CNAME record.
cnames.ownid.com in the output. If you don’t see that output at first, wait a few minutes and try the query again.
When you see that output, move onto the next step in the OwnID console. Now Click Verify.
A new panel with instructions for validating the ownership of your domain will appear:

Pending Validation until you prove the domain ownership. Let’s move to the next step.
Step 2: Validate the domain ownership
Create a new CNAME record to verify that you’re the owner of this domain. This is required to issue TLS certificates for your domain. Enter these values and save the new DNS record:The validation can take up to 72 hours, we will automatically refresh the status every 5 minutes.
Issued.
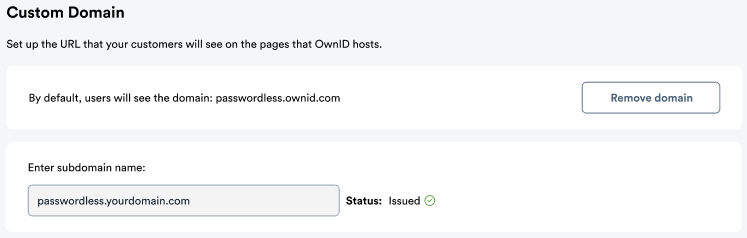
Congratulations! Your users are finally able to see your own subdomain when using OwnID.
Removing your custom domain (Optional)
If you need to remove your custom domain for any reason, you can. If you remove your custom domain, you’ll need to remove any DNS records you created for your custom subdomain and follow this guide again to add it back. To remove your custom domain completely:- Go to the OwnID console > Custom Domain tab.
- Click Remove domain.
- Read the popup confirmation, and click Disconnect to confirm the removal.
- Login to your DNS provider and delete the 2 DNS records you previously created for your custom subdomain.
Troubleshooting
My custom domain provisioning with OwnID failed. What steps can I take to troubleshoot and resolve this issue?
My custom domain provisioning with OwnID failed. What steps can I take to troubleshoot and resolve this issue?
If your custom domain provisioning fails, it may be due to missing authorization for AWS as a Certificate Authority (CA) for your domain.
OwnID uses AWS to sign certificates, so AWS must be listed as an authorized CA. Here’s how to resolve this:
- Verify CAA Records: Check your domain’s CAA records to confirm if Amazon is listed as an authorized CA. You can use a tool like nslookup to view your current CAA records. If Amazon is missing, add at least one of Amazon’s approved CA domains.
- Learn About CAA Records: If you’re unfamiliar with CAA records, this video provides a helpful overview.
- Restart the Provisioning Request: After updating the CAA record, remove the domain from the provisioning process to allow the changes to propagate. Once the domain clears, restart the provisioning request.