How it Works
OwnID supports integration with CDC through our pre-built SAP Connector.
Step 1 - Create CDC Application
Create a new CDC application with appropriate permissions.Create Permissions Group
The CDC application used for the OwnID integration requires a Permissions Group that authorizes OwnID to perform certain actions using an application key/secret. OwnID strongly recommends that you create a new CDC application that is dedicated to the OwnID integration.Securing User’s Personal DataOwnID does not store or process any user data. Users’ public keys and device information are stored on your platform.Private keys are kept exclusively on the user’s device and are never transmitted elsewhere.
Step 2 - Create OwnID App
An OwnID App is what connects the existing identity provider used by your website with the OwnID widget you insert on the front end.
appId automatically. Use that appId in OwnID SDK interaction from your website’s front end.
To Create an OwnID App
- Login to the OwnID Console (or create your account).
- Click +Create Application from the Apps screen.
- Enter a name for your application in the App name field.
-
From the Choose your integration panel, select the tile.

- Click Next.
- Enter the website URL to your application instance and click Continue.
-
Click Explore my App on the “Congratulations” popup.

-
From the OwnID Settings panel, copy the App ID and the Shared Secret for use in configuration on the side.

Your OwnID application and secret key are created and you’re ready for next steps!
Complete the CDC Integration Form
Collect the identifying information from the CDC application (site data center, site API key, application key, and application secret) and then define them in the OwnID application. When working with a site group, the API Key identifies the key of the child site.Step 3 - Integrate OwnID with Your Website
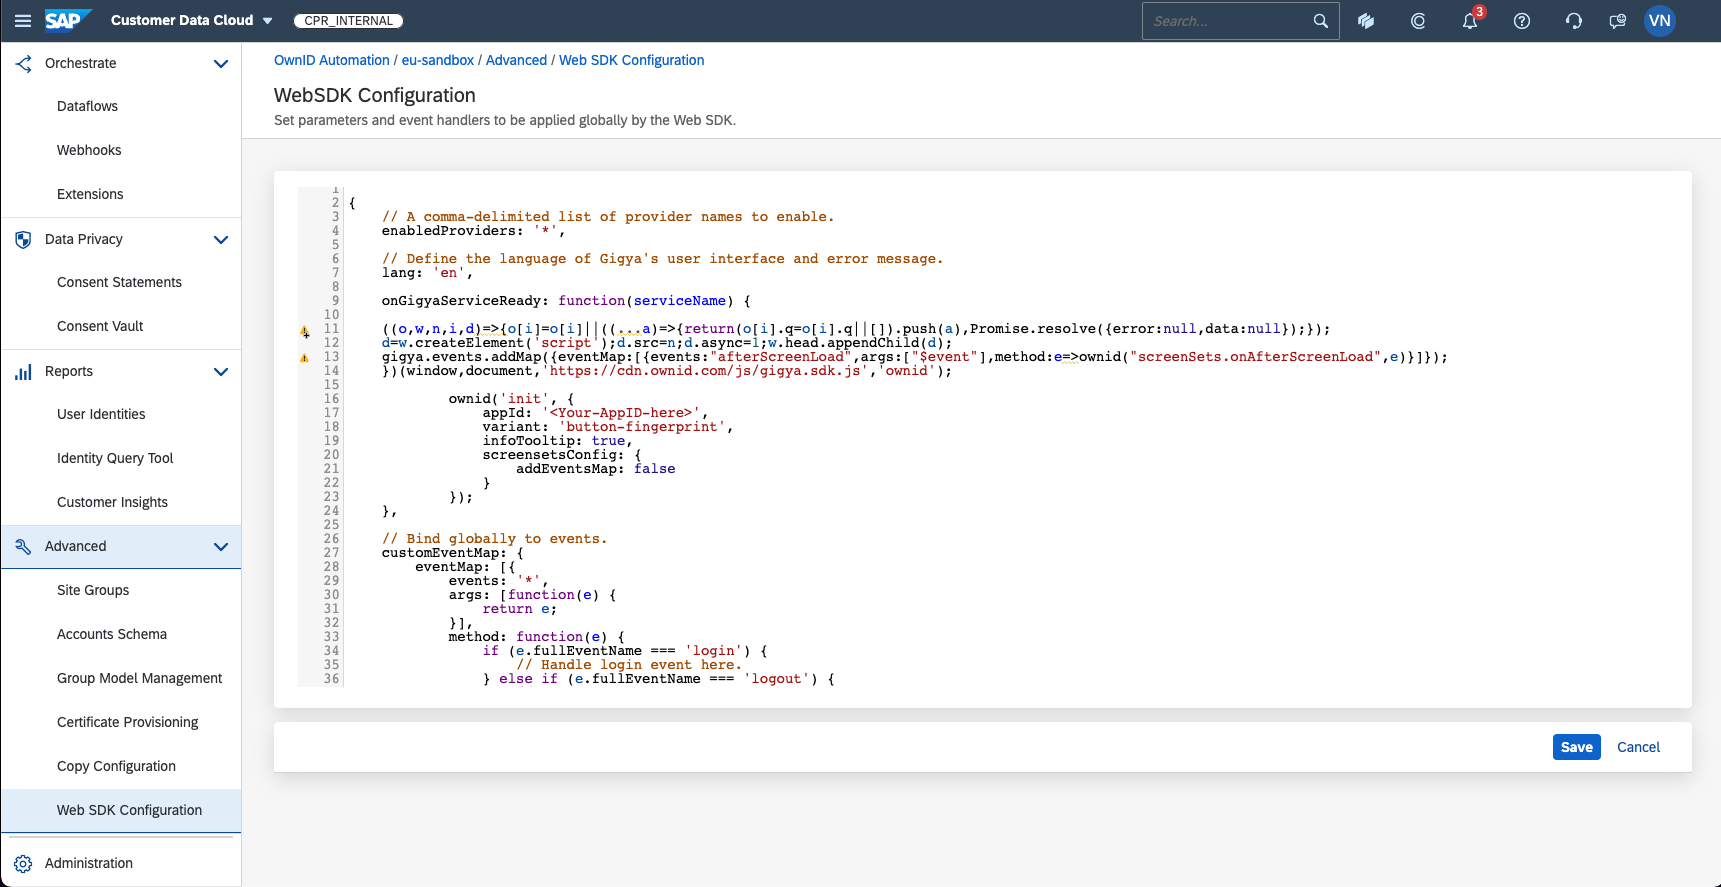
Add the passwordless feature to your registration and login flows by inserting a small block of code into the CDC WebSDK Configuration for your website. For additional configuration options that can change the behavior and look of the OwnID button, see Advanced Initialization Parameters.- Open your site in the CDC Console, and go to the Settings tab.
- In the left-hand pane, select WebSDK Configuration.
- Copy and paste the following code into the text box, being sure to initialize it with the
appIdof your OwnID application. To find thisappId, open the OwnID application in the OwnID Console and go to the My App tab.
Web SDK Configuration - onGigyaServiceReady example
- Select Save Changes.
Congratulations! Enjoy your SAP CDC passwordless authentication!
OwnID Session Creation with SAP CDC
OwnID provides flexibility in handling session creation errors during integration with Gigya. You can configure the policy to suit your website’s implementation, depending on whether or not you use Gigya screensets. Policy Options:- Always return a session (default): In this configuration, an OwnID session is always created, regardless of potential errors like missing required fields or pending account verification. The Gigya SDK automatically handles these cases by showing the corresponding screenset to the user.
- Return Gigya errors during session creation: In this configuration, if an issue occurs during the creation of an OwnID session (e.g., missing required fields, account pending verification, etc.), the Gigya error will be returned directly to the frontend.
onError function of the OwnID login widget. The most common scenarios include:
- Account Pending Registration: The user has started but not completed the registration process.
- Account Pending Verification: The user’s email address is awaiting verification (if email verification is enabled).
- If your website integrates with Gigya screensets for user interactions, choose Option 1 for a seamless user experience with minimal manual intervention.
- If your website uses custom frontend components for handling user interactions (e.g., consent screens), choose Option 2.
Advanced Initialization Options
OwnID exposes some standard events and configurtion options that allow you to further customize and extend functionality.User Interface Parameters
The OwnID widget can accomodate password hide/show functionality by assigning the relevant DOM element to thepasswordToggle attribute.
passwordToggle- If your password field includes an option to hide/show the password (typically an eye icon), then the OwnID SDK must know the DOM element of the icon so it can adjust the OwnID widget accordingly. For example, the following key/value pair sets thepasswordToggleparameter to a String that specifies the DOM element of the hide/show icon:
Configure hide/show Password Response
screensetsConfig- If your CDC implementation includes Screen-Sets with custom IDs, you must initialize the OwnID SDK with the custom IDs of the login and registration Screen-Sets. CDC implementations that use the default Screen-Set IDs can ignore this parameter. As an example, the following key/value pair passes the custom IDs of the login and registration Screen-Sets to the OwnID SDK:
Screen-Sets
Custom Code Parameters
The OwnID SDK can be initialized with custom code that is called just before or just after OwnID performs an action. This code is written as an inline JavaScript function that is passed as the value of an initialization parameter. For example, you could use theonRegister parameter to invoke a function that leverages the gtag of Google Analytics when a user registers:
Custom onRegister Function
Parameter Definitions
You can build custom functions around any of these available events:onRegister- Defines a custom function that is called just after OwnID registers a new user.onLogin- Defines a custom function that is called just after OwnID has logged in the user.onBeforeLogin- Defines a custom function that is called just before OwnID logs in the user.onBeforeLinkOnLogin- Defines a custom function that is called when an existing CDC user with a traditional password completes the process of setting up OwnID for the first time.onMagicLinkLogin- Defines a custom function that is called just after the user logs in with a Magic Link. With Magic Link, users who are using a desktop without their phone available have the option of receiving an email that contains a one-time link. Without this parameter, theonLoginfunction is called after the user logs in with a Magic Link.
Next Steps
Ready to deploy?
YES!
Take me to the Deployment Checklist